
This is a video I put together to help out a fellow knitter having difficulty understanding how I make the Mother Bears using inside out double knitting. Yes, it's way too long and very boring if you aren't a knitter and I threw it together on one "take". But, if you are a knitter, this might be very helpful! Don't forget that double knitting creates a looser fabric so you'll want to go down like 2 needle sizes.
Saturday, September 27, 2008
Friday, September 26, 2008
Pudding Shot; It's a Good Thing...
I had to get a giggle after reviewing my site meter stats and discovered what the one thing that landed most hits to my site. I don't normally spend that much time evaluating the specs on it; I mostly just like to watch the number of visits climb. :)
It was quite obvious by scrolling through the stats that my pudding shot recipe brought most people here. This is definitely an indicator that there is a desperate need for more fun in our alcohol. I'd love to hear some other concoctions.
If you didn't see it before and would like to try the recipe it's on this page!
Wednesday, September 24, 2008
Crawl Space before insulating
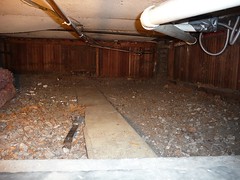
Since the dog house was being torn down I decided we should use the valuable materials and insulate the crawl space...
This looks "good" even at this stage. When I first went in there I cleaned out lots of wood planks, carpet pieces and even rat carcasses... gross. This is after I removed the falling apart insulation from the wood outer walls. 2 walls are wood which we had a rat wall poured and had it bricked in many years ago. The other walls are brick and the floor is dirt.
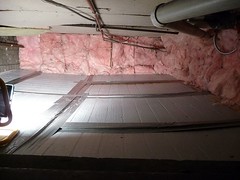
You can see the new insulation to the 2 exterior walls of the crawl space under the kitchen. Over the dirt floor is 6mil plastic then insulation then plywood was laid as a top layer to make a stable surface to crawl in the future. The plywood edges have been duct taped to prevent pinching as the plywood does move due to the insulation under it. I did stuff some insulation up into 2 large holes that were made for a cast iron pipe (no longer being used, but too darn heavy to remove). I didn't do anything with the ceiling tiles that are up there now since I'm guessing they are asbestos.
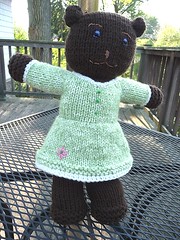
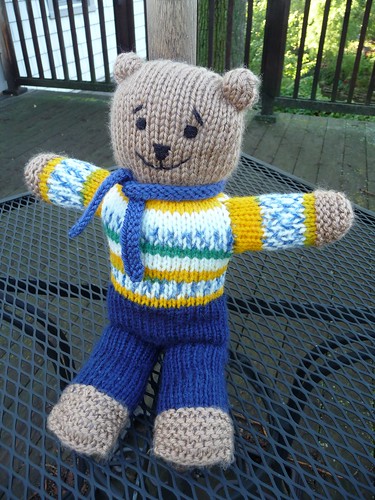
Harriet - Bear #8
Here's my latest bear, Harriet. She is bear #8 and yes her head looks bit. I think that's because she isn't wearing a scaf.
I’ve inside out double knit several of them now. I do not use the slip stitch method rather knit both sides at once. I use two strands of yarn and cast on using an alternating long tail cast on so I cast on with both strands at once. The only thing you have to remember is to twist the two yarns over each other before beginning the next row otherwise you’ll have a whole.
When I’m working the tube for the garter stitch inside out and I want my first row on the inside to be a purl I’ll knit my first stitch with both yarns in back then purl the next stitch with both yarns in front so when I see it from the outside I’m looking at my first row as being purl on both sides, but the inside (which is what you’ll see when you flip it right side out will begin with purls). The real trick when knitting the method just described is to keep to work the correct yarn because if you accidentally purl a front stitch with the yarn you’ve been using to knit the back sts the tube will not open and you’ll be plagued with a necessary frog; this is why I constantly pull the tube apart while on the needles to insure that if I did accidentally mix the yarns up I won’t have to rip back too far to correct the problem. Ok, now how to knit both sides inside out so that purl sts are facing out and knit sts are facing in… Simple as pie and actually so much easier than the regular double knitting with knit side out. After crossing your strands to avoid holes, you begin with a purl stitch using the yarn that you worked your last stitch with before turning but you will this time keep your knitting strand at the back of your work. So basically you have one strand on each side of the needle (one front, one back). I like to use my knuckle to straddle the yarns between front and back. Then you purl with the yarn in front then knit with the yarn in back and repeat but never ever move your yarns from that position! The front stays in front and works all the purls and the back stays in the back and only does knit sts! It’s almost brilliant!
When working from the legs up after you’ve gotten the desired length of the first leg you’ll cut both yarns leaving enough to close the crotch and hold the left leg either on the needles or on waste yarn (your preference).Then cast on and work the second leg. Once the second leg is the same length as the first you will join the two legs by putting the first leg back on the needles if necessary and work the next row right across the second leg into the first leg. When you come to the arm holes you will need to switch to working the chest across rather in than in the round/dk; I suppose its a matter of choice if you flip it at this point and knit or leave it inside out and purl. Rejoin after the 8 rows for the arms and work the head. I flip my work, and work the chest between the arms then flip it inside out again and finish up the head using inside out DK. The arms can be worked anyway you prefer I suppose. I usually just dpn the arms since there’s not that much to do.
Hopefully that all made sense.
Saturday, September 20, 2008
Katie Smokes everyone at race!
Katie on the totally smoked everybody coming in with a 29:04 official time. Not only was she first woman but simply FIRST. Yep, that's right, she beat the boys. Dave was kidding her about putting a p*nis on her trophy; you'd have to know DH.
Ken did outstanding as well and after a debate as to who actually was 1st, 2nd and 3rd overall for the men, Ken walked away with a 2nd place trophy! Much better than the 3rd place one they tried giving you at first. Aren't you glad Dave was there to speak up? LOL
Ken did outstanding as well and after a debate as to who actually was 1st, 2nd and 3rd overall for the men, Ken walked away with a 2nd place trophy! Much better than the 3rd place one they tried giving you at first. Aren't you glad Dave was there to speak up? LOL
Friday, September 19, 2008
YARN SCORE!!

I'm soooooo happy! I've been picking up some of the Berella 4 yarn to use on my bears and it's been on sale for $1.49. So I stop in a Michael's that I'd never been in before and low and behold they had the Berella 4 yarn on sale for 99 cents! Holy cow, I bought all the colors they had that I thought I could make work for a bedroom afghan for in the summer when we don't have the big duvet on there. It's a king size bed and I figure the finished size needs to be about 84" x 90". That's a lot of yarn! Well, the rather unfriendly cashier (not that it matters, I just feel I need to add that) didn't give me the bag that had the bag of fake gourds in it so I had to go back out to that store to get it. I hate that! So on the way out to 'out of my way', I figured I stop at "my" Michael's and see if the 1.49 price had gone down.... IT HAD! Totally cool, because I'd bought green from the far away Michael's and I didn't really want to use it, but at that cost who could resist! Anyway, after doing some figuring I was thinking I might still need a few more skeins of a few of the colors to make this afghan so I went to yet another Michael's. They did not have the yarn at 99 cent price, but I bought enough of what I thought I might need at the 1.49 price... I can always return the unused skeins.
I'm so loving this! This feeling is totally cancelling out the fact that I'm about to frog the DNA scarf becuase I didn't do the mini cables correctly... oops.
Tuesday, September 16, 2008
DNA Scarf - WIP
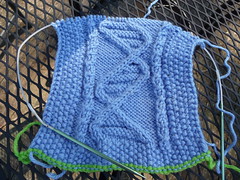
Also called the Double Helix Seaman Scarf.
This is 1 whole pattern repeat and 10 rows of the second pattern repeat. I'd almost considered ripping it back from this point because I'm not too sure about that super thick border, but now I'm not.
NOT a productive 2 days!
Yesterday after telling a very long story 5 times to Ikea reps, I discovered that the top and bottom rails of the triple track panel system that were sold to me were an "old" model. According to Sandy in textiles at the store, "No matter what you do, it won't work." Well, at least I have a definitive answer and can quit trying! This almost explains why of the 9 top/bottom rails 8 were one style with little tabs and only 1 had rollers on the top. Ironically, the rollers are the new model. I only wasted several hours staring at the wall trying to figure out how to get them on the track while assembled like the pictures show. I'm beginning to hate that little instruction cartoon guy! Anyway, I'm going to Ikea today to exchange the bad pieces.
So today, I primed the walls of the closet and was just about to break open the bucket of texture stuff and have at it when I noticed some quarter and dime size bubbles under the paint. A fingernail to the bubble would easily rip it open. Now I could just forget about this little problem and hope the bubble relaxes, but the paint is still not actually adhered to the wall underneath therefore there will definitely be future problems. The ONLY thing I did differently this time compared to every other wall I've painted including the bedroom that the closet adjoins is I used a lightweight spackle. This however is not entirely my fault. After discovering a very moldy bucket of spackle that I'd opened only a few months ago (yes, moldy... black and red mold) I called DH and asked him to pick up a bucket of spackle. I specifically told him to purchase the kind with the green lid in the 5 gallon bucket. He came home with a little gallon size bucket with a blue lid. He'd purchased the lightweight kind. I've used a lightweight before and never had this problem, but this was some new faster drying and less dust kind. Well, now there is LOTS of dust because I'm scraping the spackle and primer and old paint down to the plaster. It's only on the top portion of the closet above the wood wall molding and that's primarily where I patched. The other contributing factor is most likely that there was wall paper on the walls originally and whoever painted first didn't fully clean off the glue. I can definitely identify glue under the paint where I hadn't patched. But, the primer peels off most easily in the places where I did use the spackle. Needless-to-say, I won't be using anymore of the spackle with the blue lid. The removal is going ok so far as the paint has a soft, chalky feel which I can actually peel down to the plaster with a fingernail.
I'm a little perturbed, but shit happens!

Arrows pointing at paint bubbles
 Soft and peeling paint
 I started scraping a bit of the paint
If I find out anymore reasoning behind my bubbling freshly primed paint job I'll blog it... of course.
---------------------------------------------------
 EDIT: 9/17/08 After sucking down potentially lead containing paint dust and washing it down with TSP (again) it's ready to paint. I waited until the next day before I painted it to be sure it was dry. No bubbles!
Friday, September 12, 2008
The Results are in...
I picked up my MRI results today. I was nervous to open the envelope containing the Radiologists impressions of the scan of my left knee from Tuesday. Two things are going to happen. One is the report will say the MRI was normal in which case I'll be bewildered and stunned at what could possibly be causing my pain. I do know that MRIs are not perfect and there could be something going on that simply does not show up. Or the MRI is going to say there is a tear to my meniscus. It couldn't possibly be anything other than that since it just feels exactly like the two tears I've had before. Symptoms include:
- Isolated pain directly on the medial side of the knee joint (inside, sort of near the rear)
- Pain and stiffness after exercising but no real bother while performing the exercise
- Pain while walking down hills
- Pain when walking fast
- Inability to squat fully
- Pain when sitting on the floor with legs extended and relaxed and the left foot falls away from perpendicular to my knee
- And the most indicative indication that it is a torn meniscus is the jabbing/stabbing pains that I'll get while walking, sitting in a normal position, and disturbed sleep due to the jabs.
A drum roll please..... And the winner is... a horizontal tear in the posterior horn of the medial meniscus. Just as I suspected.
Chocolate Rum Dessert
 Today, Dave had his running buddies, Ken, Lance and Anna over for a speed workout, hot tub, dinner and beer; a usual Thursday night at our house minus a couple of the runners this time due to prior commitments and what not. Anyway, this is Lance's birthday week so I asked him what kind of dessert he'd like for after dinner. He didn't indicate a specific dessert rather that he'd prefer nothing with coconut or nuts and that anything with rum has got to be good.
 I went to work Googling for a rum dessert. The very first thing that pulled up was a "Chocolate Rum Dessert" on Recipe Zaar. I quickly scanned the ingredients and determined that I already had all the stuff to make this. Sweet! I pretty much followed the directions, but I swapped dark rum for light, I doubled the recipe and I accidentally didn't add the chocolate slowly to the egg mixture rather dumped it in which might have affected the consistency just a little bit. Anyway, I mixed it up as otherwise directed and distributed the double batch into 5 glass bowels since most "serving sizes" are ridiculously small. They then went into the refrigerator. I wanted to use fancier stemmed glasses, but the refrigerator is so full of beer from last weekend and the new stuff that was brought tonight that I couldn't possibly had gotten the taller glasses in so I settled for small glass bowels.
Prior to serving I topped the pudding like mixture with a dollop of whipped cream from the container and a few of the chocolate curls that I learned how to make just for this project. The homemade chocolate rum puddings were a hit. We sent Anna home with one, but I haven't heard her thoughts on it yet. I would definitely use my little bitty 1 cup glass bowels next time since the porportions were actually too big fixed as an 8 serving batch distributed into just 5 bowels.
To make the chocolate curls set a milk or white chocolate bar out and in a semi warm place for about an hour; NOT a hot spot, but warm. I warmed my chocolate bar by setting the unwrapped bar on a plate on the counter in front of a window with diffused sunshine coming through. The bar should not be melted, just a little flexible. Then take a piece of aluminum foil and hang it over the edge of your counter so like 6" is overhanging and crease the foil on the edge of the counter. Curl the foil hanging over the edge slightly up to catch the curls as you make them. Next the fun part! Take your dry vegetable peeler and with the long edge of the chocolate bar overhanging the counter a little bit peel off a piece of chocolate on an angle and let it fall into the foil catch below. Wallah! Very presentable chocolate curls ready to decorate any decadent dessert!
This recipe was easy to make and tasted great!
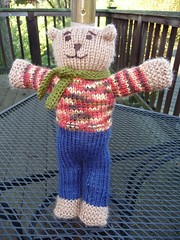
George - Bear #7
Obviously I ws trying something different for the eyes. Not sure yet if I like them or not. They were embroidered with floss this time rather than un-piled yarn strands which I liked, but I'm not sure about trying to put pupils on them. Maybe if I did the nose and mouth in a differnet color I'd like it better. Anyway, he was DK inside out feet up.
Wednesday, September 10, 2008
Freddy & Charlie; Mother Bear Project
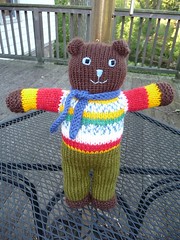
This is Bear #6, Freddy Bear. He was double-knit feet up inside out up to the sweater where I switched to dpns because the yarn is self striping. Sounds weird I know, but it was faster than double-knit right side out since there's all that yarn positioning to do.
Now meet Charlie Bear. He was knit flat and seamed together. Why did I torture myself with the seaming? Because a friend of mine was talking about how relaxing she found seaming. Yah, about as relaxing as sitting on the beach during a hurricane. Anyway, I finished bears 4, 5 & 6 before I finally finished this poor guy. He doesn't even look right :-P Oh well.
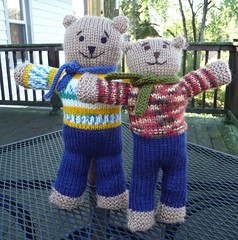
The bears knit in the round are larger than those seamed so there's more bear for your buck. Although the ones I've completed with double knitting were done on size 2 circs and size 6 dpns for the sweater they are considerably larger than the bears totally knit in the round on size 7 dpns. The flat knit one, Charlie, is scrawny compared to Freddy who was in the round.
Tuesday, September 9, 2008
Haphazard explanation of Bear #6 - double knitting
Not that it matters, but I started by casting on one foot and double knit (DK) both the front and backs at the same time which basically creates a tube so long as you twist your yarns on the ends. Normally when you DK you will move both yarns forward and knit with the "front" yarn then move both yarns back and purl the "back" yarn so basically you make stockinette on each side. However, that's a lot of moving the yarn so if you hold just one yarn to the front and one yarn to the back and begin with a purl stitch then a knit stitch essentially you are doing inside out stockinette so when I look at my hands I'm working 40 stitches on two needles that make up the 20 stitches for the front and the 20 stitches for the back and they alternate every other stitch; there are two working yarns that straddle my working needle- one yarn for the front and one yarn for the back. It's kind of the same as double knitting by using the knit one slip one method, but much faster cause you don't waste your time slipping stitches. For the feet I had to alternate every other row with so purls were facing out; oh I'm making this too confusing. Basically I double knit a tube inside out then flipped the darn thing right side and slip the stitches to dpns to work the sweater then "flattened" the circle and slipped one st from the front and one from the back onto the circular needles again to knit the head. I then picked up and knit the arms, stuffed him, grafted the head closed, sewed up the ears and embroidered the face. Every bear gets a scarf too! Perhaps I'll do a video showing the double knit inside out thing. ;-P
Wednesday, September 3, 2008
Hurt my left knee... AGAIN
I guess I better start blogging about this because it has become quite apparent over the last month that I've most certainly re-injured my left knee. It feels like another meniscus tear. Yes, once you've done this twice you have a pretty darn good idea of what they feel like.
Ok, that was August 7, 2008. I waited to see if the injury would get better over a little bit of time, but after 11 days I decided it was time to get the ball rolling and go to the clinic. Yes, I love that really good medical care we get from there, but since this was a work related injury I have to jump through whatever hoops they set up... even if they're on fire.
Dr Doolittle was his usually self using analogies like "Orthopedic surgeons are like if you were a hammer". I'm lost right off the bat of course so he continues "You know," he says. Like I'm the one that's nuts because I have no idea where he's going with this. "If you were a hammer everything you see would be a nail." Oh WOW. Dude, you really did enjoy the 70's didn't you! Anyway, I saw him on 8/18 and he wanted to see me back in 3 days and said if I wasn't completely better he'd send me for an MRI. I told him I wouldn't be, but Ok. 3 Days later he says he's not completely convinced that I'm injured and says to come back for a recheck in a week and then if I'm not better he'll send me for the MRI. The day before my 3rd visit to the industrial clinic my case manager from when I hurt the left knee earlier this year called and said that they were considering this an "aggravation" and that I would still be under the same claim number rather than the new claim which I'd already filed. That being said, I couldn't be treated by both Dr Doolittle and Dr Anderson. Lemme see... tough choice here. I see Dr. Anderson on Sept 3rd.
Sept 3. - Dr Anderson's. I was kind of surprised that he wasn't all like "what happened", but he said these things do happen although of course they don't want them to. Obviously. He's a very reputable surgeon and I have no doubts of his abilities. He ordered up and MRI and despite me telling him that I'd rather work through the pain than do temporary work again he wrote up my work note with restrictions. No kneeling, squatting, no standing or walking for prolonged periods.
Subscribe to:
Posts (Atom)


