Sunday, November 30, 2008

Squirrely Amusement

So how does somebody one day decide to build a squirrel feeder? Well, I had these peanuts and nobody was eating them, so I set a couple out on the deck rail where we frequently see squirrels and of course they ate them. So one day I decided to look up squirrel feeders and found these free plans online at Birds and Blooms

And that's basically how a goofy project was born. Now I have this squirrel feeder for entertainment! No I don't want 50 squirrels hanging around, but they are fun to watch from time to time. I haven't attached this one yet because the instructions call for making an access hole in each side of the feeder, but I think I make another one with only one hole on my viewing side. The video of the squirrel entering the feeder is right after I blocked the hole on the other side. That's why he seems a little confused.

The little grey squirrel is not timid at all. He learned quickly that I would give him nuts without harm. The black one however has not gotten that friendly.

I picked up a bunch of acorns on my route too so I have lots of free nuts for my amusement. I do have to look into getting peanuts though since the blue jays and cardinals will come along and eat the shells that the squirrels leave behind. The squirrels like bread too and they usually stick around and eat that where as the nuts they disappear to bury it.

For more amusement here are a couple of videos:


Friday, November 28, 2008

Arbor - trellis - bench


Finally I've gotten around to taking pictures of some finished wood projects. I should have gotten out there earlier when the sun wasn't sneaking around the corner. This is the garden that I'd posted about earlier and you can see the trellis and the garden bench in the picture too.

The arbor turned out great! I had it all set up and everything then one night it was really windy and it blew over. The canopy pieces substained the most damage. I had to bring the arbor inside into the hot tub room because it had gotten too cold outside for the glue to dry. A couple days later I took it back outside and set it in better knowing however that I would have to cement it in place very soon. Thanksgiving day was my next opportunity but unfortunately we had another day and.... you guessed it... the darn thing fell over again. Normally I would have completely tramatised by this, but now that I'm taking the Zoloft I just dealt with it. I hated to bring it inside again so I set up a heater and the halogen lights in the garage and did the repairs it needed in there. The glue was setting so it was all good. On thanksgiving day I attached the straps and stakes that I cut from treated wood, dug the holes, leveled it and cemented it in place.

I don't think it's going anywhere now unless someone hits it with their car! I still need to get a vine for it and I'm thinking wysteria would be a good choice.
Arbor - set in cement

Saturday, November 22, 2008

A Hashing We Will Go...


My oh my! DH and I went hashing in Commerce Twp and the hares laid quite a trail with lots of shiggy to dirty our shoes. I got my shoes mucky when I was shimmying down a tree on my stomach while straddling the tree and lost my balance at the very end which of course landed me in black muck that looked more like oil than mud. I laughed for a long time after that! What fun!

Saturday, November 15, 2008

Pumpkin Seeds, Pumpkin Puree and "Eating Pumpkin"

The large carving pumpkin doesn't get any respect as an eating pumpkin although I've been using them for just that for several years now. Every year after Halloween I make tasty pumpkin seeds and pumpkin puree and mashed pumpkin that I freeze and use the whole year. Yep, all from "carving" pumpkins. I've made dozens of pumpkin muffins, pumpkin cookies, pumpkin pies, pumpkin bread, pumpkin biscotti and pumpkin logs. I've yet to make a pumpkin cheesecake, but you can bet I will at some point. Yes all that from FREE pumpkins. Yep, I said free. Who needs to go buy "pie pumpkins" at 67 cents a pound when you can pick them right from the curb? The best time to get free pumpkins is the week after Halloween on trash day. People all over the world are throwing out perfectly good uncut, pristine condition pumpkins. They set them next to their trash so it's not like you have to dig for them. You do however have to have enough guts to stop and pick them up. :)

Ahh, anyway this year I picked up 10 pumpkins over a couple trash weeks. I did trash one since it had developed a soft spot after sitting in my garage for two weeks.

It is not recommended by the FDA that pumpkin puree be canned so how the heck do you turn those great pumpkins into year-round edibles? Easy as "pie". LOL

HARVEST THE PULP AND SEEDS:
1. Wash/scrub the pumpkin thoroughly before cutting
2. Cut in half so you have a top and bottom
3. Cut away seeds from both halves. Hold the stringy stuff and seeds in one hand and squish the seeds free landing them into a colander. Rinse the pulp from the seeds. Set aside.
4. Slice the pumpkin into 2" to 2½" strips or as close as you can get. Obviously you will cut around the stem.
5. Using a knife "fillet" the mucky stringy stuff from the pumpkin strips revealing the firm flesh underneath. You do not have to remove the skin! Unless you really like using the knife and wasting a lot of time.
6. Next you'll cube the strips so they are sort of square. No they don't all have to be the same size.


COOK THE PUMPKIN:
There are several different methods for cooking the pumpkin, but I've found the least troublesome and most consistent to be steaming. I have a very large pot with a basket that I use which will hold about 1/2 to 2/3 of a medium size pumpkin that's been cubed.
1. Toss the pumpkin cubes with the skin on into the basket and put the basket into a pot with a couple inches of water.
2. Turn the burner on high and bring the water to a rolling boil.
3. Once boiling turn the heat down to medium high and steam the pumpkin from this point for 30 minutes. If you still have white spots after 30 minutes steam it a little longer.
4. Dump the cooked pumpkin cubes into a strainer and allow to sit until long enough to handle without burning yourself. It takes a long time to cool so I recommend starting another batch or going on to working on your seeds in the meantime.


MAKE THE PUREE OR EATING PUMPKIN:
5. Once cool enough to handle you'll pretty much squish the skin away from the pulp with your fingers by sort of pinching the skin the pulp basically pops away. The skin is garbage. Put the pulp in a colander.
6. Mash the pulp while in the colander to release the extra liquid. Don't be gentle here... squish it good by pressing your hands down onto the puree so the liquid exits through the colander holes. You can use the bottom of a flat bowl or plate too! You don't have to squish it so it's dry, but you should be able to form a ball out of it that holds its shape. At this point you can fill freezer bags with pumpkin that I call "eating pumpkin". It's simply mashed up pumpkin that can be frozen for a whole year. When you're ready to enjoy I nuke it a bit until I can get it out of the freezer bag, put in a a sauce pan and add a little bit of butter and cinnamon for a tasty squash side dish. Seriously! Even my husband likes it!
7. Continuing on with making the puree; after mashing and squishing you'll transfer it to a blender or food processor if you should be so lucky and puree it. Since you squished the liquid out this is not as easy as it seems and using a spatula to slide along the wall of the blender will help get it pureed. Yes, keep the spatula firmly against the side or you'll be picking silicone out of the puree!
8. I then scoop 2 rounded cups of the final puree into freezer Tupperware. Actually I scoop it one heaping cup serving into a sandwich bag and load 2 packets into one Tupperware with a piece of wax paper between . Of course you can use freezer bags too and use any portion size you'd like just be sure to remove the air before zipping closed and flatten the bag so when they freeze you have a stack of pumpkin "bricks".

To thaw the puree I generally just let it sit in a bowl on the counter top. Discard any liquid that escapes which is why I use heaping cups because there's always liquid run off that reduces the amount of pumpkin that you end up post thawing. Substitute your pumpkin puree for the canned stuff called for in recipes!

Another way to go about this is to not squish the liquid out, puree it, then let the liquid drip out through a jelly bag or several layers of cheese cloth. The squishing method is faster though.


COOK THE PUMPKIN SEEDS:
There are several ways to make pumpkin seeds. I've tried several different recipes and methods the sure fire first step though is to boil the seeds in salt water. The ratio I use is:
1 cup of seeds
4 cups of water
1 tablespoon of salt

Each medium size pumpkin produces typically between 1½ to 2 cups of seeds so adjust the above ratio for how many cups of seeds you have. Bring the water, seeds and salt to a boil then turn down to simmer and cook for 10 minutes. Drain the seeds into a colander. I like to blot the seeds with a paper towel to remove as much water as I can.

Heat the oven to 400 degrees. Spread about a tablespoon of olive oil over the bottom of a roasting pan. Spread the seeds out over the roasting pan, all in one layer. Bake on the top rack until the seeds begin to brown, 10-20 minutes. When browned to your satisfaction, remove from the oven and let the pan cool on a rack. Let the seeds cool all the way down before eating.

Alternatively you can mix your seeds with the olive oil rather than coating the pan with it. You can use butter rather than olive oil. You can go way healthier and substitute either butter or oil with egg whites.

Typically I use olive oil with sugar mixed in for "regular" seeds and also make "Cajun" seeds where I'll add some Cayenne pepper and sugar to the olive oil and mix them up before baking. There are a lot of different recipes, but IMO the first step should always be boiling the seeds in salt water.

Tuesday, November 11, 2008

Lapse in Posting

Yikes! I haven't blogged in a while because I've been very busy with projects while the weather is still nice. To make things just a little easier I'll post my latest projects separately rather than lump them into one post. So if there are people out there that are actually interested in what I blog about you'll want to scroll down between this post and October 11th for all the newest and greatest posts. I'm adding the posts for the following; click on the link to go directly to the topic or scroll and browse!

Pumpkin Processing: Puree, seeds, eating pumpkin
Build a squirrel feeder
Build a log rack
Build a "gate"
Build a garden arbor

Build a trellis
Get bit by a dog
Make a Halloween costume
Paint the garage
Install Ikea panel blinds (finally done)
The bedroom is 98% done
Knit a pumpkin
More landscaping
Build two garden benches

Whew, I think that's it!

Wednesday, November 5, 2008

A "gate" to hide

Gate and Arbor

While I was on a building spree and working so terribly hard at making that one side of the garage look nice I was having a really hard time with the view when arriving home. Other than the neighbor's car which hasn't moved from that spot in well over a year I didn't like seeing the trash cans next to the garage. Since I still had treated wood from tearing down the dog house and I discovered several pickets from the fence I built over a decade ago I decided to build a "gate". Of course the gate wouldn't really open to another area, but it would swing out and allow more access to the garbage cans if needed. I also installed a caster on the bottom to aid in rolling and since I knew the garage isn't straight the caster would act as not only a roller, but also a stopper. Brilliant! Ok, not really, but anyway another project was started. There are 3 coats of marine quality urethane on the gate which unfortunately caused the "age" of the wood show since only 2 of the pieces had never been installed outside.

Here's the back side of the gate:

Finished Gate back

and the front side where the hinges are more visible:

Finished Gate front

Tuesday, November 4, 2008

The Log Rack

I should call it more like the "burn rack" since this construction project was began as a means to hold the scrap wood from the dog house that we can burn. I did construct a small burn pit too, but it's nothing special. I'm sure I'll redo it someday and it will be "nice".

Anyway this is the rack I built.

Finished Log Rack

And this is it filled up with the scrap pieces.

Filled Log Rack

I pretty much followed the directions found at Popular Mechanics - How to Build a Cheap, Good-Looking Firewood Rack: 2-by-Guy. I basically followed the instructions with the exception of using scrap 2x6 wood rather than 2x4s.

Monday, November 3, 2008

Build a Trellis

Finished Trellis


Oh what the heck. You just know I can't resist making something from perfectly good wood... and cedar at that! I had quite a few scraps left over from building the garden arbor; actually most of it came from me changing my design plan after construction had begun which required me to purchase an additional length of cedar. Anyway, it looked like I would have enough wood left over to build a trellis. Oh Joy!

I had an idea of what I wanted it to look like and after Google searching trellis images I found a trellis that was pretty darn close in an article at Associated Content:Making an Old-Fashioned Garden Trellis for Mom on Mother's Day , but of course I modified it a bit to meet my needs and of course use the pieces that I had on hand as effectively as possible; I didn't follow the written directions but rather used the picture as a guide. I did mess up at one point in what I was visualising, but it all worked out in the end. And thus another project was began! The design concept was simple and the biggest challenge was to keep everything evenly spaced. So there was a lot of calculating and use of spacers. Here's a real quick description.

Trellis PiecesThese are pieces left over from building the Garden Arbor. So I decided to make a trellis out of it.


Mark the position of the horizontalsWith the verticals lined up and set next to each other I marked where the horizontals would go.


Spacing the VerticalsI made some spacers to help keep everything straight. I'm about to glue my first horizontal across the verticals.


This is the photo I was using as a reference.

Saturday, November 1, 2008

Build a Garden Arbor

Arbor - Finished

So I decided that I must have a garden arbor for the "entrance" to my newly created outdoor peaceful space with the garden bench, new landscaping and freshly painted garage. I got the wood at Home Depot. After designing my arbor I bought six 1"x4"x10' and one 1"x4"x8' pieces of cedar and went to work. I only made one design change mostly because when I tried to cut 7/8"x7/8" stop pieces one fell apart in a couple places because of the knots; something to keep in mind when ripping the wood. I'm going to explain in hopefully not too much detail the construction of the arbor. It was really quite simple to make. The total cost for the wood and glue was about $53. I used an entire 8 oz bottle of glue!


Arbor - Table saw set up 
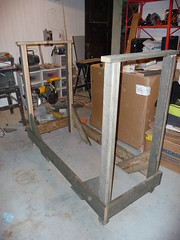
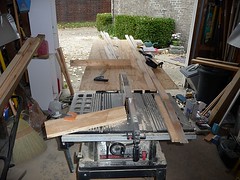
1. I needed a larger workspace to rip the 1"x4"x10' cedar boards into the size pieces I'd need for my arbor. Unfortunately it was cold outside, but the garage provided enough protection from the wind during the construction process.

Arbor - Ripped and Cut
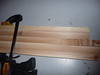
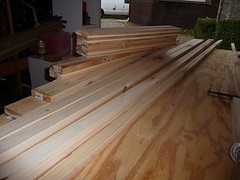
2. Here are all the pieces aftr ripping. I don't have a picture of it, but 4 of the pieces ripped for the "legs" I made a groove centered down the length wide enough to insert the horizontal lath into.


Arbor - Glue and clamp the double lathe
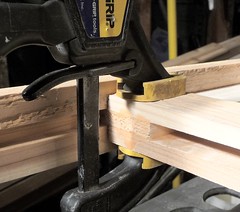
3. At this point I've glued in the vertical lath into the grooves and am now attaching the horizontal lath to the top and the bottom. Only the top and bottom will get the double lath.


Arbor - construction
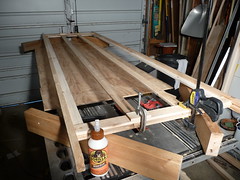
4. After letting the glue dry for the double lath on the top and bottom I then slide the other 2 vertical lath pieces between the top and bottom laths. Notice these are equally spaced. Notice that I have the side elevated on 2x4s so I can get the clamps under it. Glue, clamp, wait....

Arbor - Clamp and glue the lathe5. Wow, I need more clamps! Ok, Now for the horizontal pieces. Once I calculated how much space I would need between lath pieces I cut a piece of board to that size so I didn't have to keep measuring. The board is not pictured. Anyway, when constructing the arbor I had to keep in mind that the public side was facing down. I messed that up a few times, but it's not noticeable. This process took a while since I only had 11 clamps. Fortunately I didn't have to clamp it for too long and could remove the clamps for the next part since the side wasn't being moved around.


Arbor - Finished sides
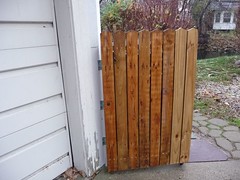
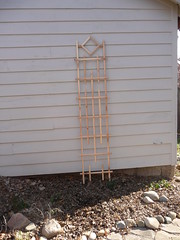
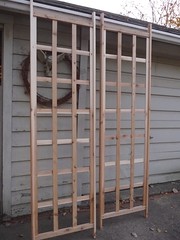
6. Here are the two finished sides for the arbor.


Arbor - Align the beam7. Next is to square the arbor and attach the beams. Notice that I've cut a notch from each end of the beam with a jigsaw. Note that the structure is elevated on 4x4's.


Arbor - Attach the beam
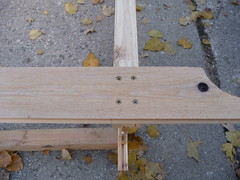
8. Finally I'm using screws! Here I've countersunk 1 5/8" deck screws to attach the beam to the sides. It's important to use deck screws since any other screw will react with the acidity of the wood. You can use stainless steel too, but that would cost an arm and a leg! To attach the beam to the other side you'll want to stabilize the unit by clamping scrap wood across each side of the bottom as seen in the picture with me standing in it. Always clamp the bottom like this when moving the arbor.

Arbor - Attach the Brace 
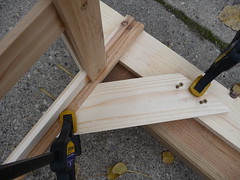
9. Attach 4 angled braces to help sturdy the structure. Both ends are cut at 45°. Technically the two 3" screws you see there horizontally should enter the brace and follow the grain of the wood. This is something I learned later, but what I did worked just fine. The other 2 screws are 1 5/8".

Arbor - Finished10. Hmm, I thought I took pictures of the canopy installation. Oh well. Obviously the canopy pieces are all centered across the top; they are glued and screwed into place.

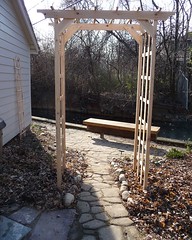
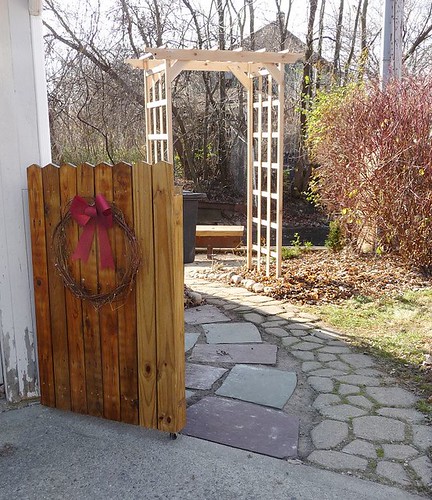
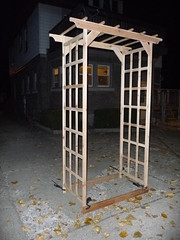
Anyway this photo shows the arbor in completion. Here you can see the braces on the bottom.


Arbor - Finished and me
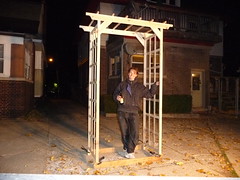
11. Have a beer and enjoy the finished structure. I was surprised at how big it looks! Yes, I have glue all over me.