Tuesday, June 30, 2009

Broken Rib with Twist Sampler Afghan Square

Broken Rib with Twist
[40sts x 60rows; way too narrow - fix: multiple of 4x11=44 plus 3+3 sts edging = co 50]
[Fix: 50sts x 61rows]
Pattern: Broken Rib with Twist

Fix instructions:

CO 50
k 3 rows
edges slip first purl last working 2 K sts after sl and before p
Work pattern rows 1-9 6 times
Purl 4 rows
BO Knitwise

[50x61]

Thursday, June 25, 2009

Candle Tree Sampler Afghan Square

Candle Tree
[39sts x 59 rows; good]

Pattern: Knittingfool.com: Candle Tree

C 39
Border Row 1: P
Border Row 2: K
Border Row 3: P
Work pattern rows 1-52 (P side = RS)
Border Row 1: P

Border Row 2: K
BO purlwise

Fits 9x9" square nicely

Monday, June 22, 2009

Eyelet Tulips Sampler Afghan Square

Eyelet Tulips[49st x 58 rows; 45sts would have been better]

Pattern: Vogue Knitting Stitchionary

In order to make this a better fit I would next time cast on 45 sts and work as follows:

CO 45
Edges: slip 1st st pwise, p last of every row, and 3 sts in seed st for a total of 4 sts worked on each edge.
Work the first and last 2 rows in seed stitch for a top and bottom border.

Follow the pattern rows as written like this:

Work rows 24-36
Work rows 1-36 once
Work rows 1-5

It's close to being too tall.

Sunday, June 21, 2009

Log Cabin Birdhouse and Bird Feeder

Bird Feeder - Cardinal

So I've always wanted to make a birdhouse or a bird feeder and now that I've finished the landscaping in the newly found backyard patio, what a better time. I looked for "thin" wood like what I've seen the pre-made birdhouses made of, but couldn't find it at a reasonable price. So I decided to use a couple of my 40% off coupons and just buy the pre-made ones. They are awfully cute after all. I dug up some really old acrylic paint and some newer acrylic paint and went to work mixing some to get different colors.

Log Cabin Bird HouseFor the log cabin, I stained the log and the chimney is drawn on with a Sharpie. For the feeder, I made 6 inserts to cover the window before painting so I didn't have to be too careful with all that trim then painted them. Lastly I sprayed both with an matte acrylic sealer. Log Cabin Bird House - mountedThe birdhouse looks a bit funny on its big pole. The pole is a PVC pipe that I painted with a floor pole plate thing attached to the bottom of the birdhouse then the connector piece on top of the pole fits into the floor thingy. I secured the pole in the ground by cementing a slightly larger piece of PVC inside of a 4x4 cement block. When dry, I fit the tall pole inside the mounting pole and inserted two bolts through predrilled holes. It seems to be working fine and it's not too wobbly in the wind.

The ivy wreath is in a perfect spot for birds waiting to get onto the feeder; yes, it's that busy some days. I've only seen a male and female Cardinal, Sparrows, and Wrens so far. The feed is the cheapest "morning song bird" mix from Walmart at about $5 for a 10 pound bag, which is a good thing too because they can easily eat an entire feeder full in a day!

Bird Feeder - SparrowsI was disappointed when I discovered that the wood of the bird feeder had split from the weather. I took it inside and pretty much disassembled the entire top and the tray and re-glued them with Gorilla Glue for wood. They probably used some cheap glue or not enough and the slightest bit of moisture spread the wood apart. Yeah, I sealed it, but not super well, I figured a few light coats would due. I'm now re-thinking that thinking. I haven't taken the log cabin back down for inspection, but I'll bet it's splitting too.

About a year later, I came to the conclusion that the bird feeder was put together with white glue which dissolves when wet. Read more about it on this post.

At any rate, I'm enjoying watching the birds from time to time and I wonder if anyone will move into the birdhouse.

Saturday, June 20, 2009

Mango, Garden and Tomatillo Salsa - Cherry Preserves too!

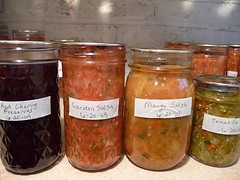
When Dave announced that he bought some salsa from the store because we were out I was desperate. There's no way my man is going to eat that when I make my own. I had stored tomatoes in the freezer from last years crop. I wasn't too sure how well the salsa would turn out with mostly frozen tomatoes, but I figured I'd give it a try. I had about 6 pounds of blanched, chopped and frozen Roma tomatoes and I bought 3 pounds from the store. I picked up 10 jalapenos, a couple red and green bell peppers, onion and cilantro from the fruit market. After doing some research about the heat factor of hot peppers I decided that I really needed to try habanera peppers, which I found at a Kroger outside the city. About half of these ingredients (plus a few other spices) would make up my "Garden Salsa" as I like to call it and with the other half I'd make up that Meijer purchased packet of "Mango Salsa" for which I bought some fresh mangos. I decided the Garden salsa should be hotter than the mango so I only used 1 habanera for the mango and 5 for the Garden style. I took 2 jars of each to a picnic recently and all four jars were slurped up in record time.

I can say that the habanera was the perfect heat! They both turned out fantastic! According to the heat index for hot peppers that I was reading about I would have had to put like 50 jalapenos in the salsa to get the same effect as 5 habanera. I hope Kroger carries habanera year round! Each batch made a total of 88 oz or 11 cups, which was canned in a variety of size jars in the waterbath canner.

I also had just about 1.5 pounds of frozen Tomatillos, so I made some Tomatillo salsa too. I only got 2 half-pint jars from that though. I haven't tried it yet. I did put a smidge of the habanera in there too.

And what the heck since I'm canning I might as well make the mess worth it so I made up some Bing Cherry preserves for topping ice cream with. Yum!

Friday, June 19, 2009

Art Deco Sampler Afghan Square

Art Deco Sampler Afghan Square
[49sts x 59rows; good]
Pattern: Art Deco
Notes:
6x4=24+15=39+4selv = 43 = 6 for each edge = 49
Instructions:
CO 49
In addition to the printed pattern each edge will include an additional 3 stitches.
Beginning Edge Slip 1 purlwise, K2
Ending edge K2, p1
Knit the first two rows
Work the fan pattern 9 times
Knit 3 rows
BO purlwise

Saturday, June 6, 2009

The New Fire Pit and Patio completed

Here are some pictures of the completed fire pit area. It's amazing that from nothing but dirt and pea stone I was able to create this relaxing space. I shoveled the dirt off cement which created the berm. Poured new cement where the existing was cracked off or lacking (the whole strip in front of the pot planter was poured new. I made the trellis (posted somewhere else), transferred and planted new plants. Wrapped my own Ivy wreath from the ivy you see growing on the fence in the background. Painted the birdhouse, created the planter, built the fire pit and the kindling holder, refinished that table which used to be green. Whew, I think that's it!


mound of dirt with flowers  kindling holder  Gargoyle with plants