Friday, September 25, 2009

Painted Garden Marker Rocks

Painted Garden Rocks

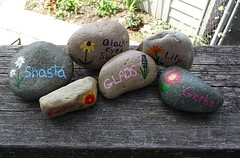
This is one of those experiments that I didn't really investigate too much. I used regular old acrylic paint and then sealed the rocks with lacquer. Why lacquer? Cause that's what I had on hand. We'll see how well it holds up.

Tuesday, September 22, 2009

Detroit River Walk and Ren Cen Fountains

Ren Cen Water Evening

It was a nice day to meet with Downtown Runners, but of course I'm still laid up from my ACL surgery. There will be no running for me for quite some time; in fact at this time I'm still in the huge brace! Needless to say I took advantage of the day and went with DH. While they ran I went down to knit and people watch at the Ren Cen.

I captured a few shots while I was there. I just love watching the kids play in the fountain!

Riverwalk by Ren Cen  Riverwalk fencing  Guidance - Ren Cen

Monday, September 21, 2009

Ben's Sweatshirt Pillow


So I've completed another sweatshirt turned into pillow project. This was Ben's favorite cross-country sweatshirt from high school. The collar and the sleeves were showing a lot of wear. Ben decided it was time to retire it so he asked me if I'd make it into a pillow like I did with Katie's.

I've had it for a long time now. Way longer than needed even for the average procrastinator to take to get around to it.

On this one I used an invisible zipper. It looks good, but I did have some trouble getting too close to the zip when sewing it and accidentally sewed across some teeth causing it not to zip properly. I ripped it back and did it over. It looks good and works great now.

Saturday, September 19, 2009

Talk Like a Pirate Day Hats


I made up these hats for Talk Like a Pirate Day Canoe and Pudding Hash for MO-A2H3. They turned out much better in the end than I though they would. Just remember to use fabric glue to apply the skull because regular old white craft glue will come off when the hat gets wet; not that any vessels were boarded, pirated and tipped or anything!
TLPD hat ON-ON

I found some simple directions for making a tri corner hat and went from there. I did keep trying to make the top or cap part fit better, but I finally decided that the best way was to use simple circles and leave it at that. After all the fabric was like $2 maybe. The foot was created by cutting out the foot form then using a stencil with acrylic paint to fill it in. After it dried I used puff fabric paint to write ON-ON. The skull was created the same way basically.


I had a great time!

Thursday, September 17, 2009

FreePress Marathon: Do I need a Passport?

Since I'm volunteering tons of time at the expo on Friday and Saturday, working the 5K packet pick up on race-day Sunday and passing out beer (yes, beer) on the route. I have been doing a little knowledge research. Let me just say this in case anyone is Googling trying to figure out if you need a passport to run the race. "Do I need a passport to the run the FreePress Marathon?" The answer is mostly yes. Everybody needs the proper document except and only except those running legs 3, 4 and 5 of the relay and those running the 5K. If you are an individual running the marathon or half-marathon or running either leg 1 or leg 2 of the relay, you MUST have one of the accepted identifications that will allow you to cross into Canada and more importantly back into the United States. You will have to have one of three pieces of identification that are being used to cross the international border from the U.S. and Canada. The three are:

1. Passport book - this baby costs like $100 and takes about 6 weeks to get. Not an option if you are planning on running at this point.

2. Passport card - IMO this is the way to go if ya have to. The cost is $45 and it's good for 10 years and adults who already have a passport book can get one for only $20. You can apply for a passport card by mail or online. You can find the nearest Passport Acceptance Facility. It takes as long to get a passcard this way as it does a passbook! BUT THERE IS HOPE! According to the website for the Detroit Passport Agency, they now issue on-site Passport Cards! It looks like you may have to make an appointment though. But it will be quicker than waiting 6 weeks.

3. Enhanced Driver's License - This you get through the Secretary of State. The cost is $45 for a regular driver's license (chauffer and CDL are more). I'm sure this will expire every 4 years like a normal driver's license. Contact your local Secretary of State for more information.
The passcard and passport fees are outlined on this page. Let me end this little informational session to add that apparently there are other documents that are acceptable. This is from the Homeland Security Department:
Beginning June 1, 2009

• U.S. citizens entering the United States at sea or land ports of entry are required to have documents that comply with the Western Hemisphere Travel Initiative (WHTI), most commonly a U.S. passport, a passport card, a trusted traveler card such as NEXUS, SENTRI or FAST, or an enhanced driver's license. See the complete list of WHTI-compliant documents.
 But I'll let you figure the rest out.

For Googling purposes ignore all this gibberish. tags: passport pass port book passcard card Detroit Canada Marathon run race half marathon half-marathon relay international bridge tunnel

Sunday, September 13, 2009

Make your own Clothing Labels: The Experiment

On my last post I talked a little bit about the ins and outs and ideas and costs of making your own clothing labels. Now I'm going to get down to making some.  (new label making info)

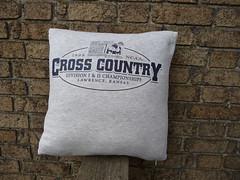
First I designed a label and I even created the tag FTC tag sort of like what was explained in the wonderful post at Duhbe. I don't have an RN number yet, but oh well. After trying the Avery labels and just not being happy with it not centering my labels, I tried several programs that I have but found that most of them wanted to paste my image in like a resolution of 96 where it was created in a resolution of 300. Finally I found that if I created a document with Word and just used columns to paste my pictures it wouldn't re-resolution them where if I created a table it would. And it was good. I had to manipulate the page settings so the labels would fit just right. I set it for 3 columns with no space between. My labels 2.5" and might be two labels like DuhBe makes or just this one that will fold over; I'm still debating.

First I will try making my own labels by creating a sheet of fabric that I can run through my printer. I'm using Egyptian cotton in white and freezer paper to create my printer friendly fabric.

Make the paper- First I cut a piece of fabric and a piece of freezer paper both a little bigger than 8 1/2 x 11. I accidentally cut it too close to 11 and the fabric way bigger than needed (I was on the phone and distracted... LOL). I did cut the fabric a little bit on the bias which is something that I didn't think of when buying the fabric my fabric is about 12 1/2" but I did turn it a little bit to avoid fraying as much as possible. I placed a piece of scrap flat cardboard on my desk. I placed the fabric on the cardboard then the sheet of freezer paper was placed with the waxy side down on top of the fabric. I ironed the freezer paper to the fabric using high heat. As soon as the iron touched the freezer paper it melted and made little pockets where the iron holes are on the bottom of the iron. I'm thinking that it would be best to place some fabric like a pillowcase on top of the freezer paper before ironing to prevent that. I allowed the fabric and freezer paper to cool completely then cut the fabric paper to 8 1/2 x 11". I chose not to include the pictures here, because it doesn't show more than the words explain.

Print on the fabric paper- My printer is an HP PSC1210 xi and I am using HP brand ink. I set my printer to "best" quality and selected "Photo" for paper type. I put the paper in so that the fabric side will be printed on; for me that meant my fabric side was face down in the printer. Print. Let dry for 15 minutes. I cut off the top 3 images and tried to "iron set" the color. I let it cool and actually it sat for more than 24 hour, but not on purpose though :). On the right you can see what the labels looked like hot off the printer.

My first experiment was just to rinse the labels in cool water. I swished two of the labels individually for about 45 seconds while rubbing it between my fingers. The result: faded labels. Below are pictures of the labels: The left ones are how they looked right off the printer and on the right is how they looked after rinsing them. The words aren't even legible. Bummer.
There is some hope though. While cutting the first three tags, I thought I would use some fray block on the edges. Well I accidentally got a drop of it on part of the ink on one of the tags. It spread a little, but not much. I wondered then if this would set the color just as it sets the edge from fraying. Without further ado I squirted a bunch of it all over a logo tag. It was pretty much dripping and it still had the freezer paper backing on it. I wonder if it would not have ran if the paper were not still on it. Anyway, I let it dry a little bit then ironed it with high heat. It got rinsed in cool water like the previous two. The result: the ink didn't fade and it looked just as it did before the water rinse. It is however much stiffer now and this might not be something that you'd want for a wearable item. Check out the before and after pictures below. I may be onto something here.


Then I decided to try a few other things which all seemed to fail. One I tried spritzing water then ironing over and over again, but I got one big blob of water and it ran right away. I also tried a quick soak with no agitation in a Woolite and water solution which faded right away (the yarn ball is where I applied a tiny bit of straight Woolite with my finger and although it did change color, it didn't fade as badly as the rest after the quick soak. It was then ironed and maybe set. It will probably run though once soaked in straight water. Lastly I dipped a label in pure Lestoil. I patted it dry and a little bit of the ink from the words came off on the paper towel. I then ironed it dry but the cloth I put over it when I ironed it didn't quite cover one of the edges and it turned brown, which I'm sure is from the intense heat on an oil soaked cloth. At least it didn't burst into flames! LOL.
So then I decided to try using other fabric sealer type stuff I had around. The verdict is still out on these since they have to dry and I will treat them at least twice before rinsing. It will take several days before I can determine if any of the three chemical sprays I used on the labels below will be wind up being the winner. So far they look good because they didn't run and they didn't fade. But they haven't been subjected to water yet either.

Well, that didn't work either! I figured for certain this would be the ticket. I must have over sprayed the Scotch-Gard because it bled and then faded big time when rinsed. The regular Camp Dry faded when rinsed also. While the Heavy Duty Camp Dry did fade at least it was still legible, but still not as good as I'd hoped for. Here's what they looked like. (Before the rinse is on the left and after rinse is on the right)


Well now that what I thought would be the ace in the hole failed I am moving on to the pre-treated fabric sheets in the package. I'm using Crafter's Images on Cotton Poplin, which I purchased at Joann. I printed one image and it looked really nice and it stood up to the rinse test. I printed just the DetroitKnitter logo to see how those colors would do and they look great after the rinse. This is the stuff! There are some drawbacks though. I had a horrible time feeding the sheet through my printer a second time for another image and the third time I tried to print on it was a complete loss and I wound up trashing most of the sheet. So you pretty much have just one shot to print on this stuff; at least with my HP printer. One other downfall is that the edges will fray. You can use Fray Check or pink the edges or fold them under and sew though. As you can see by the before and after rinsing photos there was barely any change to the ink and it's very legible!


The next experiment involves the iron-on transfer and ribbon. I've been playing with my logo design and "company name" so these images are different. Anyway, I'm using Wilton's EasyImage light t-shirt transfer. I again made up some labels on Word and printed a few on a sheet. This is tricky because you have to remember to mirror the image before printing which as you can see I accidentally did in the picture below. My first attempt was to put a logo on one side of a piece ribbon and the instructions on the other side. This failed. The ink from each side showed through to the other side. Also I had followed Grumperina's tutorial on how to do this and she said I would need to make the background color the same as the ribbon; this was not true as I later found out that the whatever is white doesn't print white rather it doesn't print at all so it's clear around the image. While this would work, I'm not totally thrilled with the waxy, dull appearance around my logo on the ribbon.

The paper seemed to feed better than the pre-treated fabric sheets, which I was using earlier, but I still had some issues with it with my HP psc1210.


Overall I can say that the happiest I am with everything I've tried is using the pre-treated fabric sheets. IF, I have the need, I may order a yard of the pre-treated fabric from C Jenkins and give that a whirl. I would never chemically treat my own though; that just seems like way too much work!

Friday, September 11, 2009

Make you own Clothing Labels: Investigation

I recently finished making the shell of a pop tab purse and I need to sew a liner for it. I've been thinking how cool it would be to have my own label inside. So I've been doing a little bit of research into this subject. I've discovered that there are a few ways to make your own labels for clothing and items. One way is to print directly onto fabric which is sewn into the article and another is to print an iron on transfer and apply the image to either fabric or ribbon. I'll be trying out a couple different ways to make a label and of course I like to make things cheap but look nice, which is why I'm not going to try to paint my own label and will use my trusty printer. I'm sure there are many other ways too, but I'm trying just two: printer fabric and iron-on transfers. If you want to skip all the ramblings of how I determined the cost per sheet you can scroll down to the the info below the dotted line. :)

 
Yes, people you can now print on fabric right from your desk! To do this you will need fabric printer sheets which you will cut into labels. These fabric sheets can also be used to create any kind of fabric panel that you want to sew or fuse into say a tote bag with a picture of your kids on it. I've sunk myself deep into discovery on the subject that I'm thinking that making your own sheets may not be worth it price and time unless you skip a vital step which makes the ink composing your smiling kid's face permanent.  One such blog boasting the affordability, ease, and even legal jumbo can be found at Duhbe.com which is has a lot of great information about labels and label making.

 
The cost associated with making your own fabric paper is not in the cost of the fabric, but in setting the ink on the fabric. There is really only one product that I've read about that does this; it is Bubble Jet Set 2000. A 32oz bottle of the stuff, which will treat 50-60 sheets depending on thickness of the fabric, costs $15.95 which if at the bare minimum of treating 50 sheets is only $.32 per sheet. However, in addition to this chemical you'll need another chemical called Bubble Jet Rinse, which I have to assume will treat the same number of sheets. The cost of the rinse is $6.95. But wait. There is shipping because of course this cannot be found in a brick and mortar store rather online like at C. Jenkins. The cheapest shipping option was $5.75. So to do the math the chemicals alone will cost $28.65 so now it will cost you 57 cents just to chemically treat one sheet of fabric that you bought yourself (see Duhbe.com for info on fabric choices). Now add the in the cost of the fabric and freezer paper and the total cost to make one sheet of printable, washable, fabric paper has gone up dramatically and you have to put all this together, cut your sheets to fit your printer and you have a huge supply of chemicals that (according to one website) has a shelf life of one year which of course is a consideration. Hmm. But, there is a first-time shopper coupon at the C Jenkins site for 20% off your first order which brings the cost down a bit.

 
Another option through C Jenkins is to purchase PreTreated fabric by the yard. Cost: 10.98 per yard + $1.99 manager's special on shipping under a $20 order = $12.97 per yard and you didn't have to buy fabric, treat it, and store chemicals. You do still have to cut the fabric and iron it to freezer paper though. With this option your "get started fee" is only $12.97 plus the cost of the freezer paper. One yard can be cut to make fifteen 8 1/2 x 11" printer sheets at a price of  86 cents per sheet... SWEET! I didn't even calculate the 20% off for first time orders either; now we're talking big savings. If you're going to make your own I'd say this is the way to go especially since you can choose whatever fabric and color you want.

 
And finally there is one more option I'm exploring to get fabric printer sheets. You can buy pre-cut, packaged, printable fabric sheets saving you lots of time. But there is a downfall... the price. At JoAnn's, you can get 6 sheets of "Crafter's Images" PhotoFabric for $13. Sure that is $2 per sheet, but when you use a 40% off coupon it's 8.27 with tax so that brings the price down to $1.38 per sheet. And if you're super thrifty you wait for a 50% off coupon for a total of $6.89 (inc tax) which brings the price per sheet down to just $1.15 per sheet. This same rule applies to Michael's too, but their fabric printer sheets were like $17 for 10. Michael's do have coupons in the Sunday paper but hardly ever a 50% off one and they will accept Joann coupons through the mail or newspaper ad but not from the internet. You can sign up to be on Joann's email and snail mail list and get coupons right to your door and in your email! This my friends has the balance of relatively cheap and fast all wrapped up together in a package that doesn't waste your entire weekend and is easy on your wallet too.

 
Not all labels have to be made using fabric sheets that you print right in your own printer though. Another way that I've read about to make labels is to use transfer paper and iron it to strips of ribbon. This can create a very cute way to make a label, but the cost factor per sheet turned out to be much higher now that I figured it out. It involves iron-on transfers and ribbon. The cheapest iron-on transfer packets I've found were at Michael's for $10 for 10 sheets. Of course I used a 40% off coupon (told you I was thrifty) and walked out the door paying $6.35. That's less than 64 cents per sheet. A double faced spool of ribbon at Joann's was $2.97 full price which is has enough length to do a lot of labels at a minimal price. Ribbon costs vary depending on width and style. I was looking at a double faced ribbon I think the yardage was 18' which is enough to make 86- 2.5" labels. This type of ribbon with a 40% off coupon of course would cost less than 3 cents per label and since you can get 30 labels on one 81/2 x 11" sheet the cost per sheet would be 90 cents. You would have to use some fray stop type stuff to keep the ribbon from fraying too. The iron on transfer would create a stiffer label and I wouldn't have to worry about bleeding though. Obviously a stiffer label for non-wearables is fine, but I don't know about putting it in the collar of a dress.

 
----------------------------------------------------------------
Here's a breakdown of the costs based on producing one 8 1/2 x 11" sheet of labels. The first two listed are purchasing the materials from C. Jenkins as described above. The third is buying the pre-packaged sheets from Joanns. And the last is the transfer on ribbon method.
My final opinion is that the Pre-Treated fabric is the best way to go. You still have to cut the fabric and iron it to the freezer paper and I definitely would not go with the first option which includes buying the chemicals. The other two options aren't really that awfully expensive considering you don't have to do a lot of cutting and you're supplies are easily stored.
For the experiments I'll be exploring making my own fabric sheets without buying chemicals, using the pre-packaged printer fabric sheets and using the iron on transfers on ribbon and cotton. Stay tuned!

 
Great Resources for treating with Bubble Jet Set. And printer ink information.

Wednesday, September 9, 2009

It's "UN-Bearable"

Bag of Bears

It's unbearable how cute these little guys and gals turn out. I finally finished the final touches on these guys that have been in a pile near my desk for at least 6 months. Next time I make one I swear to put a face on it before starting another. I'm not quite liking the Kalli's face; the floss I used to make her eyes and nose was splitty for some reason and that mouth? What was I thinking. Anyway, she is done and was an experimental bear with those puffy arms anyway. :)

Isabelle Jo Kalli Leo
From Left: Isabelle, Jo, Kalli, Leo (click for bigger pic)

Wednesday, September 2, 2009

Aran Cables Sampler Afghan Square

Pattern: Aran Scarf

I'm not so sure I like the construction of this cabled square. It just seems like some of the sts are in the wrong place; aka poorly written pattern. I'll have to make my final judgement after I block it.