Friday, October 30, 2009

Halloween Costume - the unfortunate homecoming date

Halloween 2009
Back in 1984 in the town of Allen Park, MI a tragic accident happened when a vibrant young lady ran herself over with her own car. Investigators speculate that when she entered her vehicle to go to the homecoming dance her shoe fell off and out of the car and when she reached out of the car the steering wheel broke off and she fell out. The car being parked on a hill began to roll backward and she was struck by the open door and pushed under the car where the front driver's side tire ran her over. She still roams the earth to this day looking for her lost shoe and a good party and is often seen with the steering wheel in her hand.

To make the tire marks for this Halloween costume you will need.
  • A dress or other attire you wish to wear
  • Black acrylic paint (get fabric paint if you plan on putting it on heavy otherwise plain acrylic is fine)
  • Sponge piece (a rag will do too, you'll just have to work it more)
  • Cardboard (or newspaper)
Insert the cardboard into the dress. This will block the paint from bleeding all the way through to the backside. Lay the dress with the cardboard inside down on the ground in front of the front driver side tire and angle it in a direct line to where you want the tread marks to fall.


Halloween dress before running it over

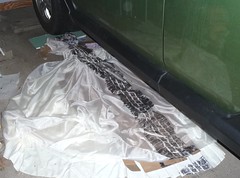
Next you will roll your car tire to just before the dress. Take the black acrylic paint and apply it to the sponge then begin dabbing the tire tread with the sponge. Reload more paint as necessary and paint about 8 or 10" of the tire; do this quickly though because you don't want your paint to dry on you. Also don't glob the paint on the tire because you want a crisp impression of the tire. Practice on some newspaper first if you find this scary. After you finish with the first section of the tire, hop back in the car and very slowly drive forward over the dress. Stop rolling before your paint runs out! Get back out and apply paint to the next section then roll that on. Repeat until you've completely ran over the dress. Allow the paint to dry for about 1/2 hour before moving it. Take out the cardboard, admire your handiness and giggle hysterically at how much fun you are going to have wearing this!

Halloween dress after running it over

A couple of notes:
  • Be careful in all the excitement that you put your car in park before jumping out!
  • Don't do this on a surface that you care about getting paint on
There are so many different ways you can do your face for this. A simple, not so messy way is to drip a little bit of fake blood on a couple locations on your face. IT ITCHES when it drips... I'm just warning you! Or you can go all out and use several products to create your look.

For my face I had on hand:
  • Liquid latex (I had some that came in a kit)
  • tissue paper (umm, from the bathroom!)
  • face paint in black and white (the kind you squeeze from a tube - available at Wal-mart and JoAnns for sure)
  • Face paints in stick form (black, red, blue); not totally necessary, but way helpful
  • blue food coloring (baking isle at your grocery)
  • fake blood
To make the gashes: First I will tell you not to put the gash too close to your mouth because all the movement of laughing all night might cause the gash to un-adhere. Anyway, take two ply tissue paper and peel the two pieces apart so you're only using one ply. Tear two strips about the size of the gash you want to make tear off the ends of the strip so it's not square. I first cleaned my skin with alcohol (not sure if necessary) then applied the liquid latex to my skin over the area where I want to create the gash. Working quickly stick the first piece of tissue onto the latex; you'll want to sort of squish it up to create a ridge. Let dry a bit and put some more latex on and another later of tissue the same way. Again allow it to dry then put latex over the entire tissue mess you now have stuck to your skin. Let the latex dry completely for each gash before moving to the next step.

To make a deathly looking bluish face with gray undertones: If you bought a stick of black face paint you will use that first and color in all around your eyes. You will basically have what looks like two black eyes. If you didn't get the stick it's ok you'll just use the tube of face paint and do the same thing.

Next squeeze out about 1 tsp of  black face paint and a small dab of white onto a mixing surface (glass bowel would work). Mix the colors together with a stick or a Q-tip that you've pulled the cotton off of and and mix until your paint is dark gray; add more white to get the right color. Now apply this color over the black you've already applied around your eyes and blend it. You don't have to get too close to your eye if you used the black face paint stick already. Next you'll apply some dark gray under your cheek bones and below your mouth to create a sunken look. Don't worry too much about making it perfect at this point!

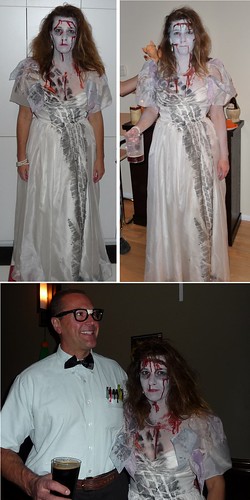
Now you'll make the blue toned all over face (and body) paint. I'm sure there are many ways to do this, but this is what I've learned. If you don't like the idea of wearing a mask all night you can do more of a color wash where you will dilute the following instructions with water I diluted the paint quite a bit to cover my arms because I didn't want it coming off on everything - see picture. If you're just doing your face you'll need maybe a tablespoon and a half of white and obviously more for body parts (less for a color wash). So squeeze out a gob of white and add just a dab of black and ONE drop of blue dye. Mix it together and adjust the color by adding more of what it seems to be lacking. Once you get your desired color you will completely cover your face. This is not as easy as it sounds! Try to work so you always have a wet edge to blend into. If it gets unworkable you can add just a drop of water to your fingers with some paint and go over the messed up part. Remember though that the black you already put on is water soluble too and you can easily mess that up so apply as quickly as you can and blend into the gray areas. If you like your look you can stop now, if you think it looks too thin apply another layer. The more layers you apply the greater the risk of messing it up and the harder it is to work. I have on one layer of blue tone in the picture with the nerd (sorry Lance) and two layers in the one with the swine flu pig on my right shoulder.

If you bought the variety pack of face paints in a stick a cool/gross thing to do is take the blue and paint veins runnins down your neck and onto your chest. That freaked out a few people too! (cool)

Add tire marks on YOU: To make the tire tracks running from my chest to my shoulder I lightly dabbed a rectangle-shaped piece of sponge into some pure black paint (spread the paint thin so you can more or less stamp on the tread). Can you believe that many people didn't even notice that my dress ended and those were my b**bs almost hanging out? Did I mention that this is really my homecoming dress from 1984?!?

Add Blood: Once you get your face on you can add blood. WARNING: it itches when it runs and at this point you can't touch your face! That being said I found that using a red make up stick to make the blood from my nose was not as maddening as dripping the fake blood. To apply the blood basically just lightly apply the opening to where you want the blood and squeeze. You definitely want to put blood on your gashes and you can even darken them a bit before hand by adding a tad of black directly on the ridge part of the latex then lightly apply the opening and squeeze while moving the bottle across the gash. Squeeze more where you want it to run and less where you don't. After applying be careful not to lean sideways or the blood trail will change direction. I take the blood with me and re-apply every hour/hour and a half for a fresh gory look that will drip while your chatting with your buddies and that'll really freak them out.

Before I end this super long post, here's a couple more tips.
  • Rat your hair for that ran over look (take a clump of hair and rake a comb through it from the ends toward the root. Apply hair spray.
  • A steering wheel cover (Wal-mart) is a great accessory and helps tell the story; it's amazing how many people don't see the tire tread marks!
  • Accessorize! Dress like you really were going out; earrings, necklace, mascara, maybe elbow length gloves (I used little stretchy gloves with matching socks that I cut off the foot part and wore on my forearms) You could get a tiara and come up with a whole new story about the tragedy and certainly change your story to fit your dress/accessories.
  • Be careful not to put blood where your seat belt will smear it; or apply it to that part when you arrive.
Ok that's all I can think of at the moment... Have a frighteningly good time!

Sunday, October 18, 2009

Out for a run

It was a gorgeous day today. The temperature was hot, but there was a slight breeze that stirred the scents of the freshly mowed lawns filling my senses with the joys of a summer run. I quickly approached Essex and forgot all about the ACL surgery that I tore back in June. My pace was quicker than I would have liked as I held a steady 7:55 for the first 1/2 mile but I didn't want to back off so I pushed forward letting the music in my ears guide each step on the asphalt. Before I knew it I had rounded Windmill Point and was now running into the wind. My breath labored as I tried to keep up the pace, but soon I would surrender to the heat and the current wind direction. "I'll just run up to the fire hydrant" I thought to distract myself from falling further from my initial pace.

A man turned down from one of the side streets and was now only about 1/10 of a mile ahead of me; his appearance and stride led me to believe that he was an experienced runner. I always wonder where other runners have been and where they will go once they are out of my sight. I appeared to be keeping the same pace with him which made me feel good considering my condition and as much as I wanted to keep going, I knew it was time to head back.

After making the turn at the fire hydrant I had the wind at my back. It's funny how it doesn't seem nearly as strong when it's at your back as it is when you're running into it. My pace had dropped significantly on my return though and I was now clocking only an 8:20 for the last 1/4 mile. I wanted my over all pace to be below 8:15 so I had a bit of ground to make up. I dug deep and found what seemed like my last piece of energy and picked up the pace. I didn't look at my Garmin for that last mile, but I felt good. It seemed like I would never make it home; I had gotten some sweat in my eyes but didn't stop to wipe it out and kept on going all the way home. My overall pace... 8:14! That was pretty darn good considering the events of the day and temperature. I was happy as a lark on the couch and fell into an even deeper peaceful slumber.

Friday, October 9, 2009

Beer Tab Purse

purse side decision


I've had this purse around forever now it seems. It is 99.5% complete and I really just have to decide if I want the round store bought huge beads or the crochet tab flowers (pictured above). Once it's done I will list it on Etsy. It will be the first thing I've ever sold, if I can decide what I want my product name to be. LOL


purse phone pocket  purse pocket

Wednesday, October 7, 2009

Stenciling and Painting T-Shirts


So for the past couple of years at least we've had a beer stop at the FreePress Marathon. This year is no exception and since I have tons of time on my hands and being the experimental type I decided to make some shirts. They will be a mock of the real logo except that the silhouette runners are carrying beer -- hee, hee. The shirt pictured above was my first attempt at the bridge; I discovered that it would take more work to get the look I want.

I cut out the stencil using the plastic stencil sheets from the craft store and several very sharp exacto blades. For a cutting surface I picked up one 12"x12" ceramic tile from Home Depot. I made a stencil for each color and labeled the bridge pieces because they would have to go back in to block the yellow. Before beginning tape a piece of wax paper inside the shirt so the paint doesn't soak in all the way to the back of the T.

After lining everything up, I stenciled the bridge. As you can see there was a lot of tedious work to put all the stencil pieces back in to make the bridge the way I wanted it to look. I went back later and hand painted on the cables for the bridge.


After the yellow was dried I rolled on the red with a stencil roller and let those dry then did the blue. The red and blue was a breeze compared to the bridge!


Next I put the wording on. I printed it off on my computer and then used a small light under a glass table as a light box. Now that I can see the words I used a fabric marker and outlined the lettering. I will be using a nifty little battery operated air pump painter to fill in the lettering, but you can just fill it in with the fabric marker. I did notice that the marker alone faded after the first washing so make sure you fill it in dark!


After it was dry I used this same outlining technique and put hash names on the back of the shirts. I got a little creative with some too!


Technical stuff:
  • Jerzee brand shirt: 50% cotton, 50% polyester
  • Paint: Cheapo Craft Smart from Michaels mixed 2 parts paint with 1 part Ceramcoat Textile Medium from Joanns (you can use Joann brand paint I'm sure - I just happened to have some of the paint colors already so I stuck with Craft Smart)
  • Tape wax paper inside the T-shirt before painting and leave it there for multiple colors.
  • Use very sharp exacto to cut
  • I bought a T-shirt cardboard cut out with a waxy surface. If you mark the corners of your stencil onto the cut out (or on a piece of masking tape on the cut out like I did) it helps to get your stencil lined up and you'll only have to measure once. Also I drew a line for where the collar is so that when I put the stencil down it would always be at the same length down from the collar.
  • Spray adhesive is a must for the stencil. I found mine at Michaels. I later found the same stuff by Elmer's at ACO in a much larger can.
  • I didn't wash the paint after every stenciling. I did however wipe the stencil while it was still on the just painted T. It seemed that after about every 4-5 T's that I needed to ungoop the stencil and respray it.
  • You can clean the adhesive off the stencil with a Goof Off type product. Alcohol (not the drinking kind - heaven forbid) will remove the last bit of goop. I found it handy to totally clean the stencil like this after about 15 T's.
  • The cleaner and tackier your stencil the better the image will come out.
  • For the yellow I used a sponge and dabbed on the paint and rolled the blue and red. I found a stencil roller at Joanns.
The shirts came out fabulous! I also did one using a polyester/spandex mix cheap tech shirt to see if the paint would last. All together I' made 27 shirts... hey, that's more than a marathon of shirts!

Using a stencil I also made a bunch of signs to put along the course...


(Tags: how stencil shirt t-shirt paint acrylic adhesive roll)

Saturday, October 3, 2009

Dave Enters 24 Hour Race

Me and Dave - Dave's 24hr run - smallNo this is not your typical race because there is not a tangible finish line; the participants just keep running from 9am Saturday until 9am Sunday and whoever has the most miles accumulated around this .9 mile loop wins. Sure you can rest, eat, even sleep during this race. Personally I would get tired of seeing the same thing over and over again.

Anyway, we arrived in Cleveland for the race late Friday afternoon, checked into our hotel, checked out the course and had dinner with other participants. Saturday morning was just as busy for me as it was for Dave since I was in charge of setting up the tent and getting all of the supplies from the car to the tent area; this took about 2 hours because in between I aided Dave in what ever he needed like salt tabs and Perpetum drink stuff.

There were secret bets being wagered as to how many miles Dave would run and I must say that everyone guessed really high except me and Lance, but he didn't count because he put in his guess well after the race started. Most guesses other than Lance's were in the low 100's. I guessed 85. This is not because I don't think he has the capability of running 100 miles, but I believed the course itself would be the downfall of him not completing 100. Plus most of our friends guessed over 100 because Nick just ran and finished the Hallucination 100 on the Poto trail giving Dave incentive not only meet the 100 miles that Nick ran but to squash the time it took him to run it as well. Nonetheless, I figured Dave would run "his speed" for the first 35-40 (which he did) and then have to walk the rest (which he did). I really thought it would be the monotonous circle and watching people running past him while he was walking that would do him in, but he stuck with it until his body just couldn't take it anymore. His calves were twitching, he had blisters on the back of one heel and his knees were tired from pounding out a 7 minute pace for 40 miles and a 14 minute walk paced for 47 miles for 16.5 hours and he took a little nap. I know that sounds insane. It was.


So when it was over, which for Dave was at 1:30am, he had accomplished 87.3 miles which is insanely great. Oh and I won the bet.