
 Today I obsessed over my knit edge technique. This was caused by a new upcoming video that I'm going to do about unknitting. Unknitting the Ks and Ps are simple really; it's the edges that cause all the problems. So I pondered once again, "How to knit a neater edge?"
 A neater edge in most people's opinion is called a Slip Stitch Edge or an Open Slip Stitch Edge, which creates a cool looking chain effect on the edges rather than the bumps you get if you knit all stitches of garter stitch pattern and in stockinette where you knit all right side stitches and purl all wrong side stitches without consideration for what is happening to the edges.
The edge stitches are called the selvage. I've read that there are times when you actually want the bumps because it's easier to line up two pieces of knit fabric row for row; I suppose seaming would an appropriate time when this would be beneficial. But I'm not into making garments. So the edges of my knitting are just as important to me as what's in the middle. Briefly I will write out the numerous ways in which people claim to get the best edge effect without the bumps. I will tell you that some of these do not work for both stockinette and garter stitch patterns. At the end of all this gibberish I will give my two cents worth opinion on which I prefer, but first...
Some quick abbreviations to limit my typing.
K = knit ; P = Purl
SL = slip one stitch. You do not actually work the yarn through the loop you are slipping.
1st = the first stitch to be worked of the row
last = the last stitch to be worked of the row
st(s)= stitch(es)
KW = knitwise or "as if to knit" Bring yarn to back as if to K , insert needle as if to K
PW = purlwise or "as if to purl". Bring yarn to the front as if to purl, insert needle as if to purl.
TBL = the needle is inserted through the back loop; rather than through the front loop (or leg).
RS = right side (the knit side of stockinette pattern)
WS = wrong side (the purl side of stockinette also called reverse stockinette)
These are examples that I've found:
- SL 1st st & last st KW for all RS rows and P all sts for all WS rows
- SL 1st st KW and K last st for every row
- SL 1st st KW on RS rows and SL 1st st PW for all WS rows
- SL 1st st PW and K last st TBL for every row
- SL 1st st PW and K last st for every row
- SL 1st st KW and P last st for every row
- K 1st st TBL and SL last st PW for every row
- SL 1st PW and P last st for every row
There is something that I learned with all this, and believe me I have a huge pile of little skinny samples I've been doing. And that is that every time I knit something there is always a border edge or a selvage which is usually seed st or garter stitch. Other than straight stockinette there is no time that I can recall the first stitch of a row being a purl. Why is this important you may wonder. Well that means to do a sample I need to knit something with a garter stitch border; or just knit garter stitch. Small steps, but I do learn some things with all this experimentation.
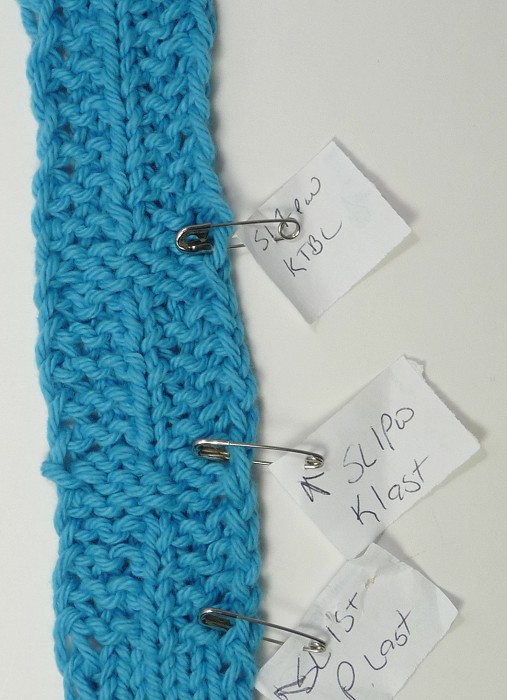
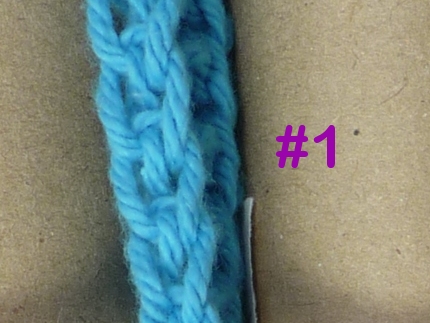 So what you really want to know is which one of that list above to use. IMO there were 3 choices by the finished look. They are pictured at the top of this post:
 - SL 1st st PW and K last st TBL for every row
- SL 1st st PW and K last st for every row
- SL 1st KW and P last st for every row
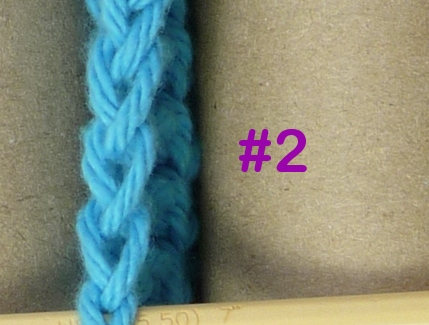 2. This one creates a twisted chain which I like better than the open chain because it is tighter. It also works for both stockinette and garter pattern. The problem with this one is that when you knit the last stitch, the stitch is twisted and is tight to knit into. Several times my needle came flying out due to the tension and I was left wondering how to put the stitch back on the right needle to knit it. This looks exactly like...
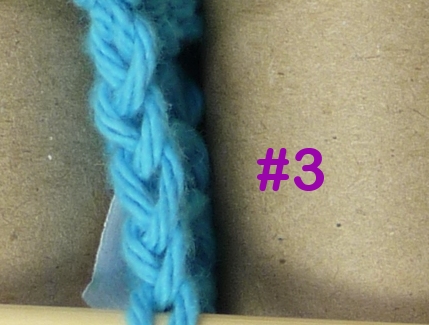
 3. This also creates the twisted chain look, it works on both garter and stockinette, it looks exactly like #2 but there is no tight twisted stitch to knit into. IMO this is the best bet.
 I did investigate into the mystery of the chain edge once a long time ago and much to my delight I havebeen slipping the the first stitch knitwise and purling the last, which is exactly what I've just suggested. Yeah!
Now you wonder, what do you do if your pattern if it doesn't already tell you to slip stitches? Ah this is easy. Simply cast on 2 more stitches than the pattern tells you to cast on. You will SL your first stitch KW, work the pattern in full for that row, then P the last stitch. Simple as pie.
Let me know if you found this helpful. I do appreciate feedback. :)


15 comments:
Hi there. It took me a while to find a you tube video on how to make a neat edge finishing for scarves and found yours demonstrating 3 options. Thank you for posting. I then looked at your blog and saw the same caring to share your tips and advice. All the best and look forward to more.
from agapia
I found your YouTube video after a google search on "neat knit edges". Im new to knitting and was having trouble deciphering some instructions in a book I purchased. I definitely like your technique better. Thank you so much for posting this very helpful video.
Thank you sooooo much. Especially loved the instruction to CO the 2 extra stitches than the pattern tells you, as I had a very jagged- edged shawl, which now can be finished beautifully. God bless you!
Hi! And THANK YOU! I am also obsessesing over my knit edge technique since I recently started SUMMIT (http://www.knitty.com/ISSUEss10/PATTsummit.php) and I really don't like the way the selvage looks like. Maybe it will be somewhat different when I block it but... I don't know... I looked for you via Ravelry link you have here but Raverly claims they do not know you.. maybe you should check it up. Best regards! Cromode
@Anonymous: Thank you for pointing that out. I had changed my Ravelry user name to DetroitKnitter... it's fixed now. Hope this edge works with your project!
What a fantastic tip and the answer to my question. You have a lot of paitence to do all the samples and research and then are generous enough to share so many thanks from a very novice (but trying hard) knitter Kim
I LOVE your concise and precise instructions about edges. You make it perfectly clear how and why to do it each way. My dishcloths and scarves will now look more elegantly finished. Thank you!
Thank you very much for sharing this wonderful tip on neat edges! You explain this so nice and easy to understand!!! Love the tutorial here, and the amazing video!
Blessings!
I've just read your blog and I have a question. Why would you add 2 sts to your pattern when you are only slipping one?
@ Maggie -
You need two. Every other row you are creating an extended stitch on the edge. It's kind of like why do you need to knit an extra stitch just to cast it off. It just works that way :)
I'm sorry that I don't have a better explanation, but I think if you tried to only add one stitch you would create a bump on one side or maybe alternating sides?
I usually knit the first stitch and Ktb the last stitch. I like the way the bumps look on project that don't need to be seamed, like dishcloths and scarves. I have been looking for something without bumps for those edges that will be seamed. Thanks for posting this. I will be using #3 a lot. btw, I am Tigers fan ... they won again today. :)
I knit the first stitch and ktb the last stitch. I like the bumps it produces on projects that don't need to be seamed like dishcloths and scarves. I've been looking for something for the edges that will be seamed so thank you for your post. I will be using #3 a lot. BTW I'm a Tigers fan.... we won again today :)
Very nice and neat looking, #3 is what I'll be using from now on for visible edges. Thank you so much!
I am saving your post. I love #3 and how it works.
I am wondering about projects where the leading edge is not stocking stitch but reverse stocking stitch. And I can't get my head around it. Any advice?
Thanks!
Q: I am wondering about projects where the leading edge is not stocking stitch but reverse stocking stitch.
A: You will always add 2 cast on stitches to what the pattern says to cast on in order to make the chain edge. So it doesn't matter which stitch the pattern starts out with. Work the first chain edge then the written pattern and end the row with the chain edge; turn and again work the chain edge stitch then the pattern and end with chain edge stitch and so on for every row. I didn't go into specifics of knitwise/purlwise since that depends on which of the 3 methods you use.
Post a Comment