Showing posts with label Experiment. Show all posts

Sunday, August 8, 2010

Stop Crying! How to Cut Onions without Tears


Today I am canning peach salsa and stewed tomatoes. As I laid out the ingredients I stared at the onions in the netted bag and pondered the question "how do I keep from crying when cutting onions". If it weren't painful, I wouldn't mind so much. So of course I set out into the world of the WWW and found a few things out about cutting onions and ways to stop the dreaded painful tears from falling.

Here's a bit about why we cry from onions from TLCcooking:

"Unless you're a chef with a freshly broken heart, the tears you shed when chopping onions aren't emotional ones. That leaves two other categories of tears: basal and reflexive. Since basal tears are the ones that hang around our eyes and eyelids to act as a lubricant, that leaves us with reflex tears. The lachrymal glands above the eyelids regulate the release of tears. In the case of reflex crying, an external irritant, such as dust or smoke, triggers nerve endings in the cornea to communicate with the brain stem. The brain registers the irritation in the eye then alerts the lachrymal gland to stimulate tear production to flush away the invader.

If we're chopping onions a few feet away from our eyes, what's causing this weepy reaction? The answer begins in the soil. Onions are part of the plant genus Allium, along with garlic, chives, leeks and about 400 other cousins. These vegetables absorb sulfur in the earth, which helps form a class of volatile organic molecules called amino acid sulfoxides. These sulfoxides are the real tear-jerkers when onions go under the knife"
So to answer the question at hand I did some more research. I've heard of and tried all sorts of different approaches such as breathing through your mouth with 2 carrots stuck up your nose which is not only unattractive but ineffective! There are suggestions to light a votive and to cut the onion under water - both of which do not solve the problem. You can dip the cut side in vinegar which will remove some of the acid, but will also change the flavor. Then there's the suggestion to wear goggles which something I had not tried yet.

So I will tell you the secret to cutting onions and not crying. Protect your eyes! I donned a pair of swimming goggles and went at it. I breathed normally and even at the end of my cutting I took a big ole whiff of the bowl of cut onions. I chopped 9 large onions and shed not one tear!

I suggest cutting the onions away from a hot stove to avoid steaming up your goggles.

Tuesday, November 3, 2009

How to Make Paper Pulp Beads

Make paper beadsSo the other day I decided to make some paper beads with the intention of including them as a freebie item for things sold - not that I've actually ever sold anything... hmmm.

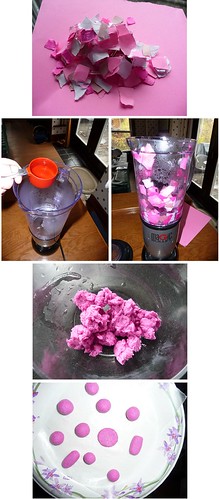
I gathered some paper; some totally headed for the recycle bin and some pink to get the right color. Then I threw in some construction paper I've had around forever and has turned gross colors on the edges from age; see there is a purpose for everything if you wait long enough!. All the paper I used had been printed before on one side and was in my scrap paper bin so technically it is recycled. :)

So first I ripped the paper into little pieces no bigger than 1" x 1". I added some water to a blender that we're no longer using, tossed in the paper pieces and turned on the blender. The paper shot up and all over the sides! Next time I'll let the paper soak up the water a bit for weight before blending.

Blend until all the paper is small and has absorbed water; you shouldn't be able to see the edges of any of the pieces any more and if you can then let it soak for a few minutes then blend again.

More water is better than not enough since you have to strain it anyway, which brings me to the next step. Strain it! I used a small mesh strainer and kind of bounced the pulp up and down in it. I squished it too until it felt rather wet but not soggy. The third picture shows what it looked like.

Next step is mix in glue. I used regular old white glue and used quite a bit of it too. It's hard to say just how much in relation to the amount of paper pulp, but I folded and blended enough so that when I rolled it in my hands I could feel the stickiness of the glue on my palms. To me that seemed gluey enough.

Next I rolled the pulp into balls or other shapes. My pulp probably wasn't loose enough to make things other than circle shapes since I rushed this and I think the paper really should sit in water overnight before blending. At any rate, I rolled the pulp into the shapes as you see and placed them on a piece of waxed paper.

They are currently dry and seem rather hard and have a bumpy, pitted texture to them. Next I'll drill holes, apply a sealer and string them as little gifts.

Wednesday, October 7, 2009

Stenciling and Painting T-Shirts


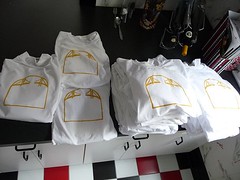
So for the past couple of years at least we've had a beer stop at the FreePress Marathon. This year is no exception and since I have tons of time on my hands and being the experimental type I decided to make some shirts. They will be a mock of the real logo except that the silhouette runners are carrying beer -- hee, hee. The shirt pictured above was my first attempt at the bridge; I discovered that it would take more work to get the look I want.

I cut out the stencil using the plastic stencil sheets from the craft store and several very sharp exacto blades. For a cutting surface I picked up one 12"x12" ceramic tile from Home Depot. I made a stencil for each color and labeled the bridge pieces because they would have to go back in to block the yellow. Before beginning tape a piece of wax paper inside the shirt so the paint doesn't soak in all the way to the back of the T.

After lining everything up, I stenciled the bridge. As you can see there was a lot of tedious work to put all the stencil pieces back in to make the bridge the way I wanted it to look. I went back later and hand painted on the cables for the bridge.


After the yellow was dried I rolled on the red with a stencil roller and let those dry then did the blue. The red and blue was a breeze compared to the bridge!


Next I put the wording on. I printed it off on my computer and then used a small light under a glass table as a light box. Now that I can see the words I used a fabric marker and outlined the lettering. I will be using a nifty little battery operated air pump painter to fill in the lettering, but you can just fill it in with the fabric marker. I did notice that the marker alone faded after the first washing so make sure you fill it in dark!


After it was dry I used this same outlining technique and put hash names on the back of the shirts. I got a little creative with some too!


Technical stuff:
  • Jerzee brand shirt: 50% cotton, 50% polyester
  • Paint: Cheapo Craft Smart from Michaels mixed 2 parts paint with 1 part Ceramcoat Textile Medium from Joanns (you can use Joann brand paint I'm sure - I just happened to have some of the paint colors already so I stuck with Craft Smart)
  • Tape wax paper inside the T-shirt before painting and leave it there for multiple colors.
  • Use very sharp exacto to cut
  • I bought a T-shirt cardboard cut out with a waxy surface. If you mark the corners of your stencil onto the cut out (or on a piece of masking tape on the cut out like I did) it helps to get your stencil lined up and you'll only have to measure once. Also I drew a line for where the collar is so that when I put the stencil down it would always be at the same length down from the collar.
  • Spray adhesive is a must for the stencil. I found mine at Michaels. I later found the same stuff by Elmer's at ACO in a much larger can.
  • I didn't wash the paint after every stenciling. I did however wipe the stencil while it was still on the just painted T. It seemed that after about every 4-5 T's that I needed to ungoop the stencil and respray it.
  • You can clean the adhesive off the stencil with a Goof Off type product. Alcohol (not the drinking kind - heaven forbid) will remove the last bit of goop. I found it handy to totally clean the stencil like this after about 15 T's.
  • The cleaner and tackier your stencil the better the image will come out.
  • For the yellow I used a sponge and dabbed on the paint and rolled the blue and red. I found a stencil roller at Joanns.
The shirts came out fabulous! I also did one using a polyester/spandex mix cheap tech shirt to see if the paint would last. All together I' made 27 shirts... hey, that's more than a marathon of shirts!

Using a stencil I also made a bunch of signs to put along the course...


(Tags: how stencil shirt t-shirt paint acrylic adhesive roll)

Friday, September 25, 2009

Painted Garden Marker Rocks

Painted Garden Rocks

This is one of those experiments that I didn't really investigate too much. I used regular old acrylic paint and then sealed the rocks with lacquer. Why lacquer? Cause that's what I had on hand. We'll see how well it holds up.

Sunday, September 13, 2009

Make your own Clothing Labels: The Experiment

On my last post I talked a little bit about the ins and outs and ideas and costs of making your own clothing labels. Now I'm going to get down to making some.  (new label making info)

First I designed a label and I even created the tag FTC tag sort of like what was explained in the wonderful post at Duhbe. I don't have an RN number yet, but oh well. After trying the Avery labels and just not being happy with it not centering my labels, I tried several programs that I have but found that most of them wanted to paste my image in like a resolution of 96 where it was created in a resolution of 300. Finally I found that if I created a document with Word and just used columns to paste my pictures it wouldn't re-resolution them where if I created a table it would. And it was good. I had to manipulate the page settings so the labels would fit just right. I set it for 3 columns with no space between. My labels 2.5" and might be two labels like DuhBe makes or just this one that will fold over; I'm still debating.

First I will try making my own labels by creating a sheet of fabric that I can run through my printer. I'm using Egyptian cotton in white and freezer paper to create my printer friendly fabric.

Make the paper- First I cut a piece of fabric and a piece of freezer paper both a little bigger than 8 1/2 x 11. I accidentally cut it too close to 11 and the fabric way bigger than needed (I was on the phone and distracted... LOL). I did cut the fabric a little bit on the bias which is something that I didn't think of when buying the fabric my fabric is about 12 1/2" but I did turn it a little bit to avoid fraying as much as possible. I placed a piece of scrap flat cardboard on my desk. I placed the fabric on the cardboard then the sheet of freezer paper was placed with the waxy side down on top of the fabric. I ironed the freezer paper to the fabric using high heat. As soon as the iron touched the freezer paper it melted and made little pockets where the iron holes are on the bottom of the iron. I'm thinking that it would be best to place some fabric like a pillowcase on top of the freezer paper before ironing to prevent that. I allowed the fabric and freezer paper to cool completely then cut the fabric paper to 8 1/2 x 11". I chose not to include the pictures here, because it doesn't show more than the words explain.

Print on the fabric paper- My printer is an HP PSC1210 xi and I am using HP brand ink. I set my printer to "best" quality and selected "Photo" for paper type. I put the paper in so that the fabric side will be printed on; for me that meant my fabric side was face down in the printer. Print. Let dry for 15 minutes. I cut off the top 3 images and tried to "iron set" the color. I let it cool and actually it sat for more than 24 hour, but not on purpose though :). On the right you can see what the labels looked like hot off the printer.

My first experiment was just to rinse the labels in cool water. I swished two of the labels individually for about 45 seconds while rubbing it between my fingers. The result: faded labels. Below are pictures of the labels: The left ones are how they looked right off the printer and on the right is how they looked after rinsing them. The words aren't even legible. Bummer.
There is some hope though. While cutting the first three tags, I thought I would use some fray block on the edges. Well I accidentally got a drop of it on part of the ink on one of the tags. It spread a little, but not much. I wondered then if this would set the color just as it sets the edge from fraying. Without further ado I squirted a bunch of it all over a logo tag. It was pretty much dripping and it still had the freezer paper backing on it. I wonder if it would not have ran if the paper were not still on it. Anyway, I let it dry a little bit then ironed it with high heat. It got rinsed in cool water like the previous two. The result: the ink didn't fade and it looked just as it did before the water rinse. It is however much stiffer now and this might not be something that you'd want for a wearable item. Check out the before and after pictures below. I may be onto something here.


Then I decided to try a few other things which all seemed to fail. One I tried spritzing water then ironing over and over again, but I got one big blob of water and it ran right away. I also tried a quick soak with no agitation in a Woolite and water solution which faded right away (the yarn ball is where I applied a tiny bit of straight Woolite with my finger and although it did change color, it didn't fade as badly as the rest after the quick soak. It was then ironed and maybe set. It will probably run though once soaked in straight water. Lastly I dipped a label in pure Lestoil. I patted it dry and a little bit of the ink from the words came off on the paper towel. I then ironed it dry but the cloth I put over it when I ironed it didn't quite cover one of the edges and it turned brown, which I'm sure is from the intense heat on an oil soaked cloth. At least it didn't burst into flames! LOL.
So then I decided to try using other fabric sealer type stuff I had around. The verdict is still out on these since they have to dry and I will treat them at least twice before rinsing. It will take several days before I can determine if any of the three chemical sprays I used on the labels below will be wind up being the winner. So far they look good because they didn't run and they didn't fade. But they haven't been subjected to water yet either.

Well, that didn't work either! I figured for certain this would be the ticket. I must have over sprayed the Scotch-Gard because it bled and then faded big time when rinsed. The regular Camp Dry faded when rinsed also. While the Heavy Duty Camp Dry did fade at least it was still legible, but still not as good as I'd hoped for. Here's what they looked like. (Before the rinse is on the left and after rinse is on the right)


Well now that what I thought would be the ace in the hole failed I am moving on to the pre-treated fabric sheets in the package. I'm using Crafter's Images on Cotton Poplin, which I purchased at Joann. I printed one image and it looked really nice and it stood up to the rinse test. I printed just the DetroitKnitter logo to see how those colors would do and they look great after the rinse. This is the stuff! There are some drawbacks though. I had a horrible time feeding the sheet through my printer a second time for another image and the third time I tried to print on it was a complete loss and I wound up trashing most of the sheet. So you pretty much have just one shot to print on this stuff; at least with my HP printer. One other downfall is that the edges will fray. You can use Fray Check or pink the edges or fold them under and sew though. As you can see by the before and after rinsing photos there was barely any change to the ink and it's very legible!


The next experiment involves the iron-on transfer and ribbon. I've been playing with my logo design and "company name" so these images are different. Anyway, I'm using Wilton's EasyImage light t-shirt transfer. I again made up some labels on Word and printed a few on a sheet. This is tricky because you have to remember to mirror the image before printing which as you can see I accidentally did in the picture below. My first attempt was to put a logo on one side of a piece ribbon and the instructions on the other side. This failed. The ink from each side showed through to the other side. Also I had followed Grumperina's tutorial on how to do this and she said I would need to make the background color the same as the ribbon; this was not true as I later found out that the whatever is white doesn't print white rather it doesn't print at all so it's clear around the image. While this would work, I'm not totally thrilled with the waxy, dull appearance around my logo on the ribbon.

The paper seemed to feed better than the pre-treated fabric sheets, which I was using earlier, but I still had some issues with it with my HP psc1210.


Overall I can say that the happiest I am with everything I've tried is using the pre-treated fabric sheets. IF, I have the need, I may order a yard of the pre-treated fabric from C Jenkins and give that a whirl. I would never chemically treat my own though; that just seems like way too much work!