
Over the last few days leading up to a weekend party I had the pleasure of learning about paper mache and making piñatas! A friend was having a pig roast to commemorate the end of alimony to his ex wife. There has been mention that he was attempting to make a piñata in the shape of a pig for the event. "Ooooh, now this is something I'd like to try," I thought to myself. Well on Wednesday I called him up and asked him if he was successful making the pig piñata; he was not. He said it cracked in half during the drying process. He could have done a few things wrong. 1) he'd never made one and was making it with his kids - so way too much glue was used. 2) he was trying to cover one of those huge punching ball things. I told him I'd give it a whirl.
So I went to work doing a little research about the construction, supplies and methods of making one and the paste. Seems there are a lot of different recipes out there for paste; I've tried to combine the best of them all into what I think will be an awesome paste.
PAPER MACHE SUPPLIES:
3 Tbsp wheat flour1/2 tsp powered corn starch
(1/4 tsp salt can be added if you live in a humid state and molding is an issue before it dries - I didn't use salt)
1 Tbsp regular white sugar
water
pot, spatula & pie dish or bowl
strips of newspaper
strips of white paper or white spray paint
wet rag to wipe gooey hands on
PIG PINATA SUPPLIES:
pink spray paint (white too if you don't use white paper for the last layer)masking tape
duct tape
string
1 helium quality balloon
4 toilet paper tubes
1 spray paint top or Scrubby Bubbles top (something resembling a pig snout)
1 pipe cleaner
Cardboard scraps shaped like ears
2 Googley eyes
Nostrils can be foam cut outs or you can just draw them on with permanent marker
string
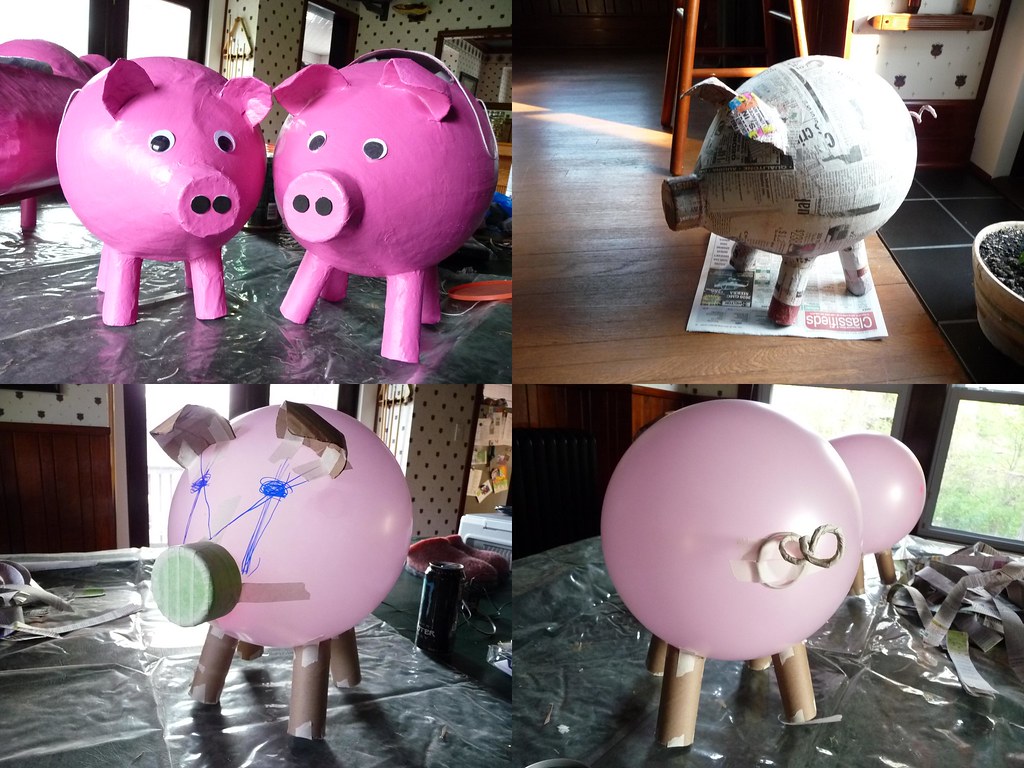
This is how I made my pig piñata form. First I made the pig form; this included blowing up the balloon and tying it off; taping the legs, ears and snout on with masking tape (use masking tape so you can carefully reposition it if needed). You can tape the tail on now or add it later. Hints: to get the balloon to stay still while you tape on the legs - roll a couple small pieces of masking tape and put them on the edge of a bowl now place the balloon on the tape now tape the legs on top so basically the pig is on it's back; otherwise this part will drive you insane. As you can see I drew like an "M" where the face goes to help with alignment of the eyes and ears. If it doesn't stand up right after you flip over on it's feet, you can shove some cardboard into the legs to weigh it down where needed; in the end it will hang so it's not that important.
Next I made the paper mache glue.
- In a pot bring 1 cup of water to a boil. Meanwhile...
- In a bowl mix together 3 Tbsp of wheat flour with the 1/2 tsp cornstarch (add salt if needed for humidity)
- Stir in cool water (not the stuff on the stove heating) as needed to this flour mixture so it can be poured; maybe 1/4 cup - I didn't measure - it's not that important just so long as you can pour it out.
- Once the water is boiling remove it from the heat and slowly stir in the flour mixture; a whisk works well, but a spatula is ok.
- As you add the flour you should notice that it is thickening up a bit; this is good.
- Now stir in 1 Tbsp of sugar
- Return the mixture to stove and stir constantly until you get the first bubbles of boiling. DO NOT OVER COOK.
- Remove from heat and set aside to cool; 10 minutes should be enough.
- Allow it to cool without stirring until it's luke warm or all the way cool; it doesn't have to be warm when you use it. You can make a double or triple batch; I used some left over the next day and it was fine - cover with plastic wrap if storing for a while.
Go get your paper mache glue, it should look like it has filmed over and is sort of one blob in the pan. Pour it out into a user friendly vessel like a pie pan. A regular bowl can be used too, but I found it easier to work with the glue and strips in a shallow bowl. Ok, pour the goop from the pan into the bowl of your choice.
Begin applying glued strips to the piñata form. Taking one strip of newspaper at a time, place onto the paper mache glue you poured into your user friendly bowl. It does not have to be submerged. In fact the goop is so thick the newspaper doesn't sink. Pat it onto the glue then take the strip between two fingers and strip the glue off. When stripping the glue off you should be also smearing the glue all over one side of the strip. You don't have to cover both sides; the glue will seep through. The strip should not have chunks of glue rather a very thin coat. Next you will apply the first strip... anywhere; add more strips overlapping the adjacent strip(s). Try not to overlap too much; 3/8" is plenty. When you go around the legs you want the strip to be on both the leg and the balloon body so it is secured when it's all dried. Making little slits on one long edge will help get the paper wrapped around both.
LET IT DRY. If you are rushed like I was; a fan is a huge help. Rotate the paper mache form to dry all sides. Areas around the legs and snout tend to have more paper and glue and will take the longest to dry.
Add another layer: To help see where you need to add the next layer, draw all over the first layer with red marker. (My first attempt to identify was to add food coloring to the glue; this was not obvious enough though.) Again LET IT DRY!
I read that it is recommended to do 3 layers so that's what I did. For the last layer on one I used white paper strips and for the other I continued with the newspaper (more on that below). The white strips need to be a little wetter since the paper is thicker; a thinner white paper other than printer paper would be ideal. Anyway; LET IT DRY!
Ok, three layers are done. You are now probably very giddy (err, maybe that was just me). Now you have two choices. IF you used white paper, it's time to spray paint with pink. If you used newspaper you will want to apply 1 or 2 layers of white spray paint before the pink; trust me yes, this is necessary otherwise the newspaper ink is very hard to cover. BUT I think the all over newspaper pig was way smoother than the pig finished with one layer of white pape.
After you are satisfied with the coverage of pink and it's dry; it's time to poke the balloon. It will not explode (this was my fear). When you poke it the air will simply seep out. Now is the time to cut your opening for the goodies to be added. I tried both a triangle cut on the top and a square cut closer to the butt and lower than the top. A bit of clear tape can be used to secure the flap back down after filling it. Anyway, poke the pig with a pin. Then immediately cut your access panel and help pull the balloon from the sides. This is something I wasn't aware would be an issue and while the balloon pulled itself off the sides it pulled in the sides a little here and there. So remove the balloon asap. The dryer the paper mache the better for this step.
Now it's time to add the features; white glue works great to attach the eyes. Poke a hole for the tail. Take the pink pipe cleaner and fold it in half twisting it to form one thicker piece. Now corkscrew it into a pig tail looking thing and stick it in the hole you just made; add a little white glue around the hole and onto the pipe cleaner and let it dry.
For the hanger, I used two pieces of thin nylon string. The two strings came up from each side of the pig near the top then connected to form an upside down V; this seemed like I would have good balance. You can do this with just one string too, but I felt I wanted two strings. Punch a hole with a thin nail in the pig near the top on one side. Put a small piece of duct tape over the hole on the inside it's easier to find this if you keep the nail in the hole as a guide. Punch the hole again going through the duct tape. Thread in the string. Now you'll need to do more than just knot the string because it will pull out when it's weighed down with candy. I used a couple pieces of thin scrap wood. Not everyone has that on hand so I would suggest making a couple of newspaper rolls or a strip of cardboard like 1/4" thick and say 1 1/2" long. You will tie the string hanging on the inside around your cardboard/newspaper strip. Tie it several times, put it in inside. Do this with the other string. Now take both of the ends that are outside the pig and pull them up evenly and tie them together. You'll probably need another length to string up the piñata when it gets to it's destination so take extra with you. Oh and if you used nylon string, you can keep it from unraveling by singeing the ends by briefly holding a flame to the ends.
All you need now are willing participants and a big stick or bat. I'm not sure of the safety factor with blindfolded children at this point because my pig recipient was an adult and we let him watch the pig explode on impact!
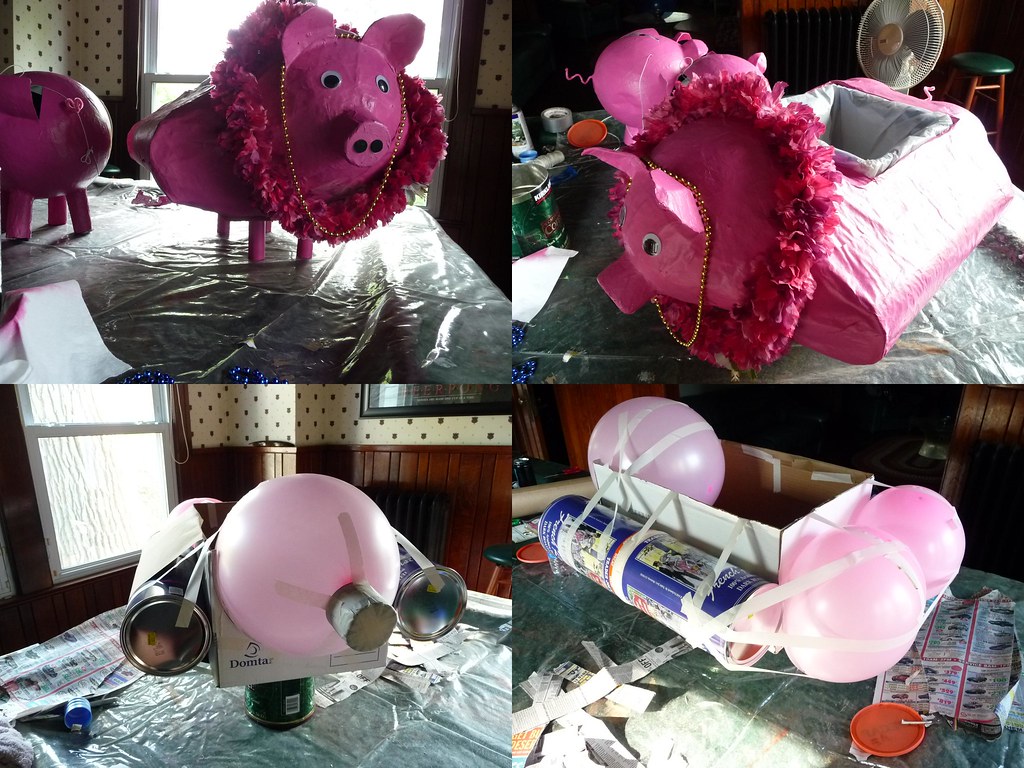
This other picture here shows the jello shot pig holder that I whipped up using the same concept as above. I made this one in one day; if I really had time I might have been able to come up with something rounder. :)
More Tags: how to make a paper mache piñata, glue, hang, construct, build, form, create, balloon


1 comment:
Thanks for great Instructions, those were of great help. I made a beautiful Piggy pinata. I wish i could post the pictures of my Piggy :-)
Post a Comment