
Ink and paper cost money, but one thing you can do is reduce the use of both by taking advantage of the features on your printer. This little tutorial type explanation is based on my own personal settings and printing habits with my HP Officejet 6500, but I'm sure in this day and age most modern printers have some sort of ink saving features that are well worth looking over. I've had this particular HP for 2+ years. I print everything for my online shop on it - and I mean everything; iron on inkjet sheets, transfer paper, freezer paper, card stock and of course regular office paper. This printer has served me well!
I print the receipts so they only take up 1/2 of a sheet of paper and I reduce the ink. I have the setting saved so all I have to do when I want to print a customer's receipt is hit "print", select "properties" and in the "printer shortcuts" tab I select that setting. Here, I'll show you (click on the picture if you need to see it bigger)...
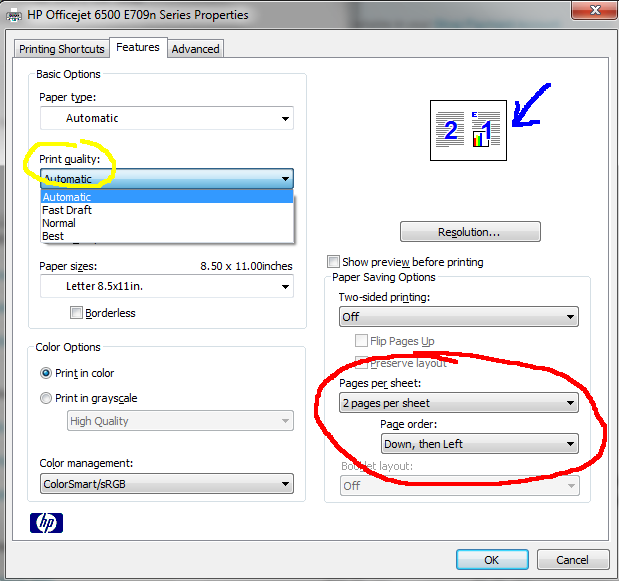
In this photo above I'm on the "Features" tab. I got to this tab after selecting "print" and then the "properties" tab. On the right side are paper saving options. I've circled in red where I selected the 2 pages per sheet and left then down for the page order options. After you select 2 pages per sheet, you will see the paper set up icon (blue arrow) change. Select your desired "Print Quality"; I want my customer to get a decent looking receipt so I select "normal", BUT I turn down the ink which I will show you next.

In this picture, I am now on the "Advanced" tab. The "Ink Volume" is by default on Automatic. Clicking on the Automatic button allows you to select "change" (labeled as 1. above). By selecting "Change" a second "Change" box appears and when you click it a little window with a slider opens allowing you to further manipulate the amount of ink you use for that print job. I slide it to the lightest setting.

If, after you've made these change you want to save these settings to use for future print jobs, go back to the "Printing Shortcuts" tab and at the bottom click "Save Setting". A window opens for you to name your setting.
So now, as shown in the last picture, I have saved those settings for future use! I've been printing a 1/2 page receipt for myself too for which I set the print quality to fast draft and again turned the ink volume all the way down.

FINAL NOTE: to print 2 receipts per page, after the first one prints reinsert the paper blank side first. I print both my receipt and my customer's on one page then cut them on my cutting board. PayPal receipts will print with the paper already cut in half, but I can't seem to get my Etsy receipts to do that so I have to print them on one page then cut them.
Looking for more ways to use the paper the receipt is printed on? I cut the blank strip at the bottom off and use it to make my matchbook style "thank you" memo pads. The customer's receipt doubles as a place to write a short thank you message.


1 comment:
Great marketing advice for any real estate professional. I found this post because I am doing exactly what you suggested and trying to stay one step ahead of the others!
Post a Comment