So the other day I decided to make some paper beads with the intention of including them as a freebie item for things sold - not that I've actually ever sold anything...
hmmm.
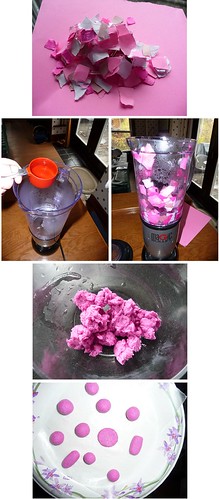
I gathered some paper; some totally headed for the recycle bin and some pink to get the right color. Then I threw in some construction paper I've had around forever and has turned gross colors on the edges from age; see there is a purpose for everything if you wait long enough!. All the paper I used had been printed before on one side and was in my scrap paper bin so technically it is recycled. :)
So first I ripped the paper into little pieces no bigger than 1" x 1". I added some water to a blender that we're no longer using, tossed in the paper pieces and turned on the blender. The paper shot up and all over the sides! Next time I'll let the paper soak up the water a bit for weight before blending.
Blend until all the paper is small and has absorbed water; you shouldn't be able to see the edges of any of the pieces any more and if you can then let it soak for a few minutes then blend again.
More water is better than not enough since you have to strain it anyway, which brings me to the next step. Strain it! I used a small mesh strainer and kind of bounced the pulp up and down in it. I squished it too until it felt rather wet but not soggy. The third picture shows what it looked like.
Next step is mix in glue. I used regular old white glue and used quite a bit of it too. It's hard to say just how much in relation to the amount of paper pulp, but I folded and blended enough so that when I rolled it in my hands I could feel the stickiness of the glue on my palms. To me that seemed gluey enough.
Next I rolled the pulp into balls or other shapes. My pulp probably wasn't loose enough to make things other than circle shapes since I rushed this and I think the paper really should sit in water overnight before blending. At any rate, I rolled the pulp into the shapes as you see and placed them on a piece of waxed paper.
They are currently dry and seem rather hard and have a bumpy, pitted texture to them. Next I'll drill holes, apply a sealer and string them as little gifts.


No comments:
Post a Comment