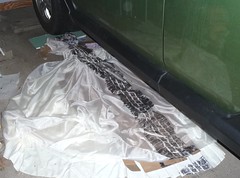
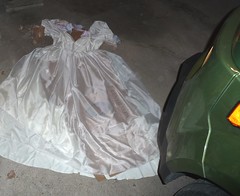
To make the tire marks for this Halloween costume you will need.
- A dress or other attire you wish to wear
- Black acrylic paint (get fabric paint if you plan on putting it on heavy otherwise plain acrylic is fine)
- Sponge piece (a rag will do too, you'll just have to work it more)
- Cardboard (or newspaper)
Next you will roll your car tire to just before the dress. Take the black acrylic paint and apply it to the sponge then begin dabbing the tire tread with the sponge. Reload more paint as necessary and paint about 8 or 10" of the tire; do this quickly though because you don't want your paint to dry on you. Also don't glob the paint on the tire because you want a crisp impression of the tire. Practice on some newspaper first if you find this scary. After you finish with the first section of the tire, hop back in the car and very slowly drive forward over the dress. Stop rolling before your paint runs out! Get back out and apply paint to the next section then roll that on. Repeat until you've completely ran over the dress. Allow the paint to dry for about 1/2 hour before moving it. Take out the cardboard, admire your handiness and giggle hysterically at how much fun you are going to have wearing this!


A couple of notes:
- Be careful in all the excitement that you put your car in park before jumping out!
- Don't do this on a surface that you care about getting paint on
For my face I had on hand:
- Liquid latex (I had some that came in a kit)
- tissue paper (umm, from the bathroom!)
- face paint in black and white (the kind you squeeze from a tube - available at Wal-mart and JoAnns for sure)
- Face paints in stick form (black, red, blue); not totally necessary, but way helpful
- blue food coloring (baking isle at your grocery)
- fake blood
To make a deathly looking bluish face with gray undertones: If you bought a stick of black face paint you will use that first and color in all around your eyes. You will basically have what looks like two black eyes. If you didn't get the stick it's ok you'll just use the tube of face paint and do the same thing.
Next squeeze out about 1 tsp of black face paint and a small dab of white onto a mixing surface (glass bowel would work). Mix the colors together with a stick or a Q-tip that you've pulled the cotton off of and and mix until your paint is dark gray; add more white to get the right color. Now apply this color over the black you've already applied around your eyes and blend it. You don't have to get too close to your eye if you used the black face paint stick already. Next you'll apply some dark gray under your cheek bones and below your mouth to create a sunken look. Don't worry too much about making it perfect at this point!
Now you'll make the blue toned all over face (and body) paint. I'm sure there are many ways to do this, but this is what I've learned. If you don't like the idea of wearing a mask all night you can do more of a color wash where you will dilute the following instructions with water I diluted the paint quite a bit to cover my arms because I didn't want it coming off on everything - see picture. If you're just doing your face you'll need maybe a tablespoon and a half of white and obviously more for body parts (less for a color wash). So squeeze out a gob of white and add just a dab of black and ONE drop of blue dye. Mix it together and adjust the color by adding more of what it seems to be lacking. Once you get your desired color you will completely cover your face. This is not as easy as it sounds! Try to work so you always have a wet edge to blend into. If it gets unworkable you can add just a drop of water to your fingers with some paint and go over the messed up part. Remember though that the black you already put on is water soluble too and you can easily mess that up so apply as quickly as you can and blend into the gray areas. If you like your look you can stop now, if you think it looks too thin apply another layer. The more layers you apply the greater the risk of messing it up and the harder it is to work. I have on one layer of blue tone in the picture with the nerd (sorry Lance) and two layers in the one with the swine flu pig on my right shoulder.
If you bought the variety pack of face paints in a stick a cool/gross thing to do is take the blue and paint veins runnins down your neck and onto your chest. That freaked out a few people too! (cool)
If you bought the variety pack of face paints in a stick a cool/gross thing to do is take the blue and paint veins runnins down your neck and onto your chest. That freaked out a few people too! (cool)
Add tire marks on YOU: To make the tire tracks running from my chest to my shoulder I lightly dabbed a rectangle-shaped piece of sponge into some pure black paint (spread the paint thin so you can more or less stamp on the tread). Can you believe that many people didn't even notice that my dress ended and those were my b**bs almost hanging out? Did I mention that this is really my homecoming dress from 1984?!?
Add Blood: Once you get your face on you can add blood. WARNING: it itches when it runs and at this point you can't touch your face! That being said I found that using a red make up stick to make the blood from my nose was not as maddening as dripping the fake blood. To apply the blood basically just lightly apply the opening to where you want the blood and squeeze. You definitely want to put blood on your gashes and you can even darken them a bit before hand by adding a tad of black directly on the ridge part of the latex then lightly apply the opening and squeeze while moving the bottle across the gash. Squeeze more where you want it to run and less where you don't. After applying be careful not to lean sideways or the blood trail will change direction. I take the blood with me and re-apply every hour/hour and a half for a fresh gory look that will drip while your chatting with your buddies and that'll really freak them out.
Add Blood: Once you get your face on you can add blood. WARNING: it itches when it runs and at this point you can't touch your face! That being said I found that using a red make up stick to make the blood from my nose was not as maddening as dripping the fake blood. To apply the blood basically just lightly apply the opening to where you want the blood and squeeze. You definitely want to put blood on your gashes and you can even darken them a bit before hand by adding a tad of black directly on the ridge part of the latex then lightly apply the opening and squeeze while moving the bottle across the gash. Squeeze more where you want it to run and less where you don't. After applying be careful not to lean sideways or the blood trail will change direction. I take the blood with me and re-apply every hour/hour and a half for a fresh gory look that will drip while your chatting with your buddies and that'll really freak them out.
Before I end this super long post, here's a couple more tips.
- Rat your hair for that ran over look (take a clump of hair and rake a comb through it from the ends toward the root. Apply hair spray.
- A steering wheel cover (Wal-mart) is a great accessory and helps tell the story; it's amazing how many people don't see the tire tread marks!
- Accessorize! Dress like you really were going out; earrings, necklace, mascara, maybe elbow length gloves (I used little stretchy gloves with matching socks that I cut off the foot part and wore on my forearms) You could get a tiara and come up with a whole new story about the tragedy and certainly change your story to fit your dress/accessories.
- Be careful not to put blood where your seat belt will smear it; or apply it to that part when you arrive.


No comments:
Post a Comment