
Canning is getting more popular too with the economy being bad. For like $25 I made 27 jars of applesauce that will certainly last an entire year even when giving some away. Of course for a first time canner there are initial expenses, but if you continue to can you will save in the end: canner $14, jars ($9/12), jar lifter & funnel ($3/4 each?). The most time consuming part is peeling, coring and chopping the apples so it's helpful if you have two people canning together.
This is a quick Tutorial on how I make applesauce and can it. If anyone wants more information or has questions I'd be happy to answer them as best as I can! I suggest you take notes on how much of what you use so when you make it again you can perfect your previous batch.
SUPPLIES:
- apples (10# = about 4.5-5 quarts)
- sugar
- cinnamon, all spice (optional)
- apple juice (not necessary, but produces a better taste)
- 1 pat of butter
- stuff to peel, core and chop with. You don't have to get high tech here
- something to mash downward with, a potato masher works well
- water bath canner (just saw one at Wal-mart for $14)
- canning jars with lids and rims
- jar lifter - necessary!
- wide mouth funnel - not necessary, but very messy without
- tongs or magnetic jar lid lifter (I made mine with a dowel and glued a magnet to the end with Goop)
- hot pads
- newspaper
- rag/towels
FIRST:
- Put water in the canner with the lid on and turn it to high first because it takes forever to boil.
- You have to heat your jars. They say to boil them in water for 10 minutes, but I don't have that much stove room so I picked up this little trick and it works great. I put an aluminum pan on my electric griddle, put water in the pan then turn the jars upside down and put them in the pan so the mouth of the jar is in the water. Turn the griddle on 400 and it will sanitize and heat the jars (of course the jars are clean to begin with though).
- The jar lids need to be heated to 160 degrees. For me that's medium low which produces small bubbles, but not boiling.
- The rims need to be on hand (clean and dry)
- Set up a cooling area by putting several layers of newspaper down so you don't burn your counter
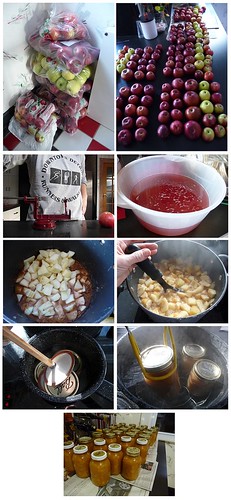
Next is to peel, core and cut. I picked up my apple peeler (pic 3) at a garage sale for a couple dollars but I had a rather cheap plastic one that I got from Big Lots for $5 that I used for several years and it worked fine. I found that neither peeler cored well plus it spirals the apple and I want chunks not slivers. Obviously you can use a regular vegetable peeler. After peeling, you can core the apples using an apple corer or just cut the apples and use a paring knife to remove the seeds and core; I tend to use both depending on the size of the apple and vertical alignment of the core. I found it better to chop up the apples into like 1" pieces (no rocket science here) so they cook faster and are easier to mash. I tried a hand-crank chopper once, but wasn't crazy about the little pieces and it was almost harder to mash them when they are so small.
Cook the apples. I always start off my applesauce cooking with water and apple juice that I got from the previous year's apple peel (pic 4) and freeze in Zip-Lock bags. Check back soon for more on apple peels, apple juice and apple jelly! Anyway, you can use store bought apple juice (recommended if you don't have your own) or water (better with some juice though). I like cinnamon applesauce, but it's not necessary and you can adjust the amount to your liking. Technically sugar is not supposed to be necessary, but I always add some because Dave likes the sauce to serve as a side dish and desert! So add sugar if you like; the official recommended amount is 2 Tbsp per 4 cups. You'll put your apples, juice, sugar and spice in a large pot. Add a pat of butter to keep the applesauce from foaming while it cooks.
 Here's my applesauce recipe for a 10 pound batch:
- 10 #of a variety of apples
- 1 1/2 C apple juice
- 1 1/2 C water
- 2 C sugar
- 1 Tbsp cinnamon
- 1/4 tsp all spice
So put all the ingredients in a large covered pot on high (pic 5) until it boils then turn it down to medium low heat. You'll want to cook it for at least 30 minutes and while it's cooking you need to mash it up; I use a potato masher (pic 6). If you don't have a masher or want smoother applesauce you can transfer several cups at a time to a blender and give it a quick whirl. I've used this method when I got lazy, but most of the apples were already mashed up.
Fill the jars. Grab one of the jars (w/ a hot pad!), put the funnel into the mouth and fill it to 1/2" from the top. You're suppose to run a plastic thing around the inside of the jar at this point, I usually use one of those lettuce cutters or the handle of a spatula or sometimes I forget and nothing horrible has ever happened just don't use a metal object. Wipe the rim of the jar! Using tongs or a magnetic lid lifter (pic 7). (hint: if you put the lids in the pot one up, one down, one up, etc it's easier to get them out). Position the lid on the jar rim and screw on a rim finger tight. I know your instinct is to wrench on it, but seriously finger tight (like screwing in a light bulb) is what you want.
Process the jars. Using a jar lifter lower the jars into one of the slots in the metal rack inside your canner. I stagger the placement one across from another so the rack doesn't tilt and knock the jars on their side. (pic 8) I also don't lift the entire rack out of the canner. I've burnt myself way too many times doing that and have therefore removed the handles on the side of the rack. You want your jars to be covered by at least 1" of water; a pot of boiling water on the side is helpful if the level is too low after loading it. Once the canner returns to a boil start your timer: 20 mins for 1/2 pint and pint, 25 minutes for quarts. Beginning at 1,000 feet to 3, 000 feet you want to increase the processing time by 5 minutes for each additional 3,000 feet. Search online if you're not sure.
Remove the jars. Using the jar lifter (pic 8) remove the jars one by one (or dare to use the handles on the rack!). With a rag underneath to catch falling water place the jars about 2" apart on the newspaper (pic 9). Sometimes the seal on the jars will pop while you're carrying it; this is ok. You may or may not hear the seal on the jars pop indicating that it is sealed. You can test the seal the next day by pressing down on the center of the lid; if it gives way, your seal is broke. You can reprocess within 24 hours if this happens, but make sure you use a new lid!
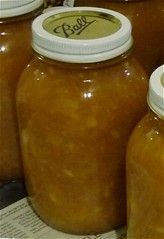
Store the jars. The next day you can remove the rim (prevents rusting), wipe down the jar, and label it. I've been using masking tape on the side of the jar to label because the stickers you sometimes get when you buy the jars do not come off easily when you want to reuse the jar and since i use the replacement plastic screw on lids if I write on the seal it gets thrown away and I don't know when it was made. Obviously if you are gifting the jar you can use a nicer label :) Put the jars in a cool place out of sunlight. I've stored my canned goods for 2 years plus with no incident. Most information says to store no longer than 2 years and some say just one year.
If you ever open a jar and it didn't seem like it was sealed, smells funny, doesn't look right and heaven forbid has a white webby look... DO NOT EAT IT! It's not worth the risk. Out of the hundreds of jars I've canned I've only thrown away 2 jars of stewed tomatoes so it's really not likely that your seal will fail if you process the jars correctly.
I hope you've found this information helpful! Like I said before ask if you have any questions and I'll do my best to answer!


No comments:
Post a Comment